You've probably heard that an eSIM (embedded SIM) is a digital SIM card, but how do you install eSIM on your iPhone? It's actually a really fast process that takes less than two minutes.
Here at aloSIM, you can buy eSIM data packages for 170+ countries , and there are three different methods for installing eSIM on any eSIM compatible iPhone or iPad . Once you have an eSIM installed on your device, activate your eSIM data package for instant access to data networks in that particular country or region.
If you’re brand-new to using eSIM for your iPhone, here are the three steps to putting instant data on any eSIM compatible device :
1. Buy an eSIM data package
2. Install your eSIM (This is what we're talking about today)
3. Activate your eSIM data package
Why do I need to install eSIM?
A physical SIM card can't work if you leave it in the package, because it needs to be inserted into your phone. So it makes sense that a virtual SIM (eSIM) can't work unless it's also added to your phone. Except with an eSIM installation, you don't need to mess with any of your phone's components.
NO opening that little SIM card slot
NO touching any "real" SIM cards
NO removing or adding any SIM cards
What happens when I install eSIM?
When you install eSIM on your iPhone (or iPad), that eSIM is now a part of your device. (It's invisible and totally virtual, but it's there inside ... in a spiritual kind of way.)
An installed eSIM is sort of like an app on your phone. You can use it, but you can't see it, and you can eventually delete it (but we don't recommend tha t, unless you're absolutely sure you don't want to use that eSIM ever again.)
But an eSIM itself isn't enough to connect to those data networks. An eSIM is HOW you connect to the network, but you need ACCESS to those networks in order to use their data.
So once you install eSIM on your iPhone, you'll still need to activate your data package to get permission to start using the data. Make sense?
When do I install eSIM?
If you've purchased an eSIM data package to use while traveling to another country, we recommend installing your eSIM a couple of days prior to leaving. This is mostly so you know you're on a strong, reliable Wi-Fi or data connection.
It takes a bit of Wi-Fi or data to connect to aloSIM in order to download and install the eSIM, and we don't want the process to get interuppted by a crummy signal. (Please, please, please avoid installing your eSIM in an airport terminal, where the Wi-Fi can be awful.)
Where do I install eSIM?
You can follow the instructions on alosim.com , or within the aloSIM app . But your iPhone eSIM settings will be where most of the action happens.
How do I install eSIM?
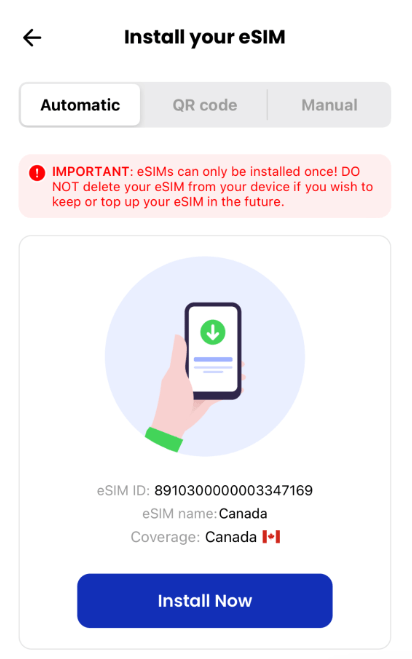
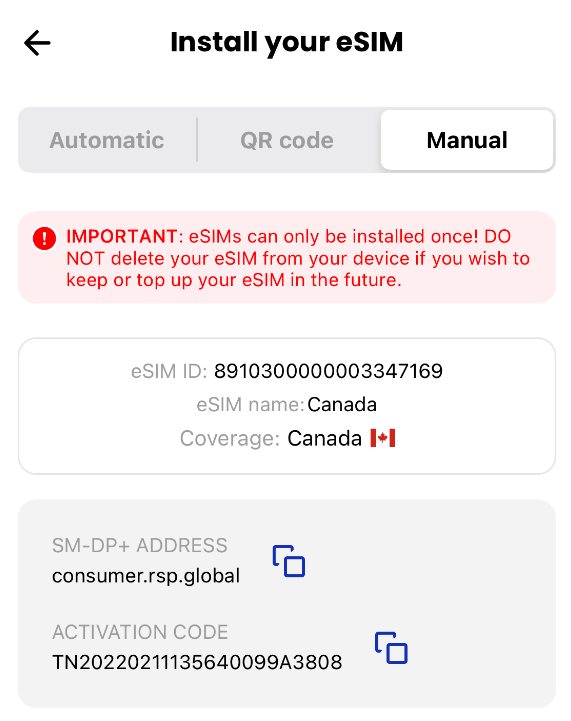
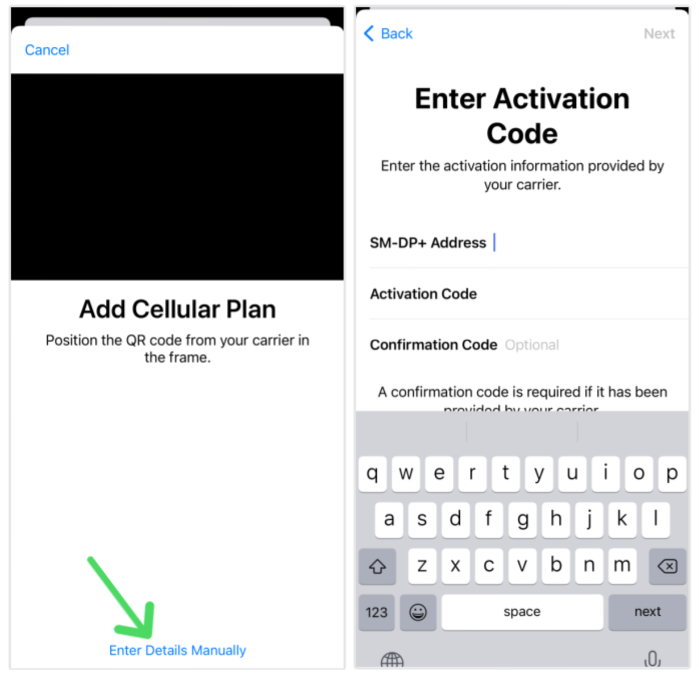
There are three different methods for installing eSIM on any eSIM compatible iPhone or iPad : Automatic , QR code , or Manual eSIM installation . You can find all three eSIM installation options by going into your aloSIM account (either on the web , or in the app ):
1. Go to "My eSIMs"
2. Select the eSIM you just purchased
3. Choose "Install Your eSIM"
Then you can choose from Automatic , QR code , or Manual eSIM installation methods. (We recommend going with "Automatic," since it's exclusive to iPhone and iPad users, and it honestly does 99% of the work for you.)
Start by logging into your account within the aloSIM app or on alosim.com. Go to to "My eSIMs," select the eSIM you just purchased, choose "Install Your eSIM," and select the "Automatic" tab.
1. Tap the blue "Install Now" button
2. Tap "Continue" to let it work its magic
(This usually takes about two minutes, as the eSIM is installed on your device.)
(Depending on which iOS you're running, your iPhone may also try to activate your data package at the same time , but this will only happen if you're already in the correct country/region for that eSIM.)
3. Follow the on-screen prompts
If you're asked to choose a Default Line: Choose your Primary SIM, since eSIMs don't come with phone numbers.
If you're asked to choose a plan for iMessage and FaceTime: Choose your Primary SIM (and later, you can make sure iMessage is using your Apple ID email address as well)
If you're asked to choose a Cellular Data Source: Choose your Primary SIM if you're still at home. Choose your eSIM if you want to start using your data (and you're already in the correct country/region for your eSIM to work) and make sure "Allow Cellular Data Switching" is toggled OFF so your phone doesn't try to switch between your two SIMs.
Nicely done! Your eSIM has been installed using the Automatic method. If you're running the latest iOS, your APN will be set automatically. (If not, here's how to set it your APN to "alosim." )
["PGRpdiBjbGFzcz0iYWxvLWJsb2ctYmFubmVyIGFsby1ibG9nLWJhbm5lci0tdHlwZTEgZ3V0ZW5iZXJnLWJsb2NrIiBkYXRhLWJhbm5lci1pZD0iODEzMzQiPgogICAgICA8ZGl2IGNsYXNzPSJhbG8tYmxvZy1iYW5uZXJfX2xvZ28iPgogICAgICAKCgoKCgogICAgICAgICAgICAgICAgICAgICAgCiAgCiAgCgogICAgICAgICAgICAgPHN2ZyB4bWxucz0iaHR0cDovL3d3dy53My5vcmcvMjAwMC9zdmciIHdpZHRoPSIxMTIiIGhlaWdodD0iNDAiIHZpZXdCb3g9IjAgMCAxMTIgNDAiIGZpbGw9Im5vbmUiPjxnIGNsaXAtcGF0aD0idXJsKCNjbGlwMF8zMDE2XzQ1OTkpIj48cGF0aCBkPSJNMjguOTM0NCAwSDIyLjUxNDZWMjQuMTcxNkgyOC45MzQ0VjBaIiBmaWxsPSIjMTUzMEJCIj48L3BhdGg+PHBhdGggZD0iTTQzLjU1MTUgMTcuOTk5QzQ0LjM4ODEgMTcuMTcxIDQ0LjgwNzkgMTUuOTI3NSA0NC44MDc5IDE0LjM2MTVDNDQuODA3OSAxMi43OTU0IDQ0LjM4OTYgMTEuNTk4NCA0My41OTg1IDEwLjc3MDRDNDIuODA3NCA5Ljg5NTg1IDQxLjgzMTQgOS40ODE4NCA0MC42Njc1IDkuNDgxODRDMzkuNTAzNiA5LjQ4MTg0IDM4LjUyNzYgOS44OTU4NSAzNy43MzY1IDEwLjcyNTRDMzYuOTQ1NCAxMS41NTM0IDM2LjU3NDEgMTIuNzk2OSAzNi41NzQxIDE0LjM2M0MzNi41NzQxIDE1LjkyOSAzNi45NDY5IDE3LjE3MSAzNy43MzY1IDE4LjAwMDVDMzguNDgwNiAxOC44Mjg2IDM5LjQ1ODEgMTkuMjQ0MSA0MC42MjA1IDE5LjI0NDFDNDEuNzgyOSAxOS4yNDQxIDQyLjc2MDQgMTguODMwMSA0My41NTE1IDE4LjAwMDVWMTcuOTk5Wk0zNS4zNjQ3IDIzLjIwMTJDMzMuODI5NCAyMi40MTgyIDMyLjYyMDEgMjEuMjIxMSAzMS43MzY1IDE5LjcwMTZDMzAuODUzIDE4LjE4MjEgMzAuMzg3NyAxNi40MzMgMzAuMzg3NyAxNC4zNjE1QzMwLjM4NzcgMTIuMjg5OSAzMC44NTMgMTAuNTg1OSAzMS43MzY1IDkuMDY2MzNDMzIuNjY3IDcuNTQ2NzkgMzMuODc2NCA2LjM0OTc2IDM1LjQ1NzEgNS41MjE3NEMzNi45OTIzIDQuNjkzNzIgMzguNzU5NCA0LjMyNDcxIDQwLjY2NzUgNC4zMjQ3MUM0Mi41NzU1IDQuMzI0NzEgNDQuMzg4MSA0LjY5MzcyIDQ1LjkyMzMgNS41MjE3NEM0Ny41MDU1IDYuMzQ5NzYgNDguNzE0OSA3LjU0ODI5IDQ5LjU5ODQgOS4wNjYzM0M1MC41MjkgMTAuNTg1OSA1MC45NDczIDEyLjM4MTQgNTAuOTQ3MyAxNC4zNjE1QzUwLjk0NzMgMTYuMzQxNSA1MC41MjkgMTguMTgzNiA0OS41OTg0IDE5LjcwMTZDNDguNjY3OSAyMS4yMjExIDQ3LjQ1ODUgMjIuNDE4MiA0NS44Nzc4IDIzLjIwMTJDNDQuMjk1NiAyNC4wMjkyIDQyLjUyODUgMjQuNDQ0NyA0MC42MjIgMjQuNDQ0N0MzOC43MTU1IDI0LjQ0NDcgMzYuOTQ2OSAyNC4wMzA3IDM1LjM2NjIgMjMuMjAxMkgzNS4zNjQ3WiIgZmlsbD0iIzE1MzBCQiI+PC9wYXRoPjxwYXRoIGQ9Ik01NS44Nzg0IDIzLjU3MDJDNTQuNTI5NiAyMi45NzE3IDUzLjQ1OTYgMjIuMTg4NyA1Mi42Njg1IDIxLjE3NjFDNTEuODc3NCAyMC4xNjM2IDUxLjQ1OTEgMTkuMDExNiA1MS4zNjY3IDE3LjcyM0g1Ny4zNjY2QzU3LjQxMzYgMTguNDEzMSA1Ny43Mzk1IDE4Ljk2NjYgNTguMjk3MiAxOS4zODA2QzU4Ljg1NDkgMTkuNzk0NiA1OS41NTM1IDIwLjAyNTYgNjAuMzkwMSAyMC4wMjU2QzYxLjEzNDIgMjAuMDI1NiA2MS43Mzg5IDE5Ljg4NzYgNjIuMTU3MiAxOS41NjUxQzYyLjU3NTUgMTkuMjg5MSA2Mi43NjE5IDE4LjkyMDEgNjIuNzYxOSAxOC40NTk2QzYyLjc2MTkgMTcuOTA3NSA2Mi40ODMgMTcuNDkyIDYxLjg3ODQgMTcuMjE2QzYxLjI3MzcgMTYuOTQgNjAuMzQzMSAxNi42MTc1IDU4Ljk5NDMgMTYuMjk1QzU3LjU5ODUgMTUuOTcyNSA1Ni4zODkxIDE1LjY1IDU1LjQ1ODYgMTUuMjgyNUM1NC41MjgxIDE0LjkxMzUgNTMuNjkxNSAxNC4zMTUgNTMuMDM5OCAxMy41MzM0QzUyLjM0MjcgMTIuNzUwNCA1MS45Njk5IDExLjY5MTQgNTEuOTY5OSAxMC4zNTY0QzUxLjk2OTkgOS4yNTA4MyA1Mi4yOTU3IDguMjM4MyA1Mi45NDc0IDcuMzE3MjhDNTMuNTUyMSA2LjM5NjI2IDU0LjQ4MjYgNS42NTk3NCA1NS42OTIgNS4xMDc3M0M1Ni45MDE0IDQuNTU1NzEgNTguMzQ0MiA0LjMyNDcxIDYwLjAxNzMgNC4zMjQ3MUM2Mi41Mjg1IDQuMzI0NzEgNjQuNDgzNSA0LjkyMzIyIDY1LjkyNDggNi4xMjAyNUM2Ny4zMjA2IDcuMzYzNzggNjguMTU3MiA4Ljk3NDgyIDY4LjM5MDUgMTAuOTU0OUg2Mi43NjE5QzYyLjY2OTUgMTAuMzA5OSA2Mi4zODkxIDkuNzU3ODQgNjEuODc4NCA5LjM0MzgzQzYxLjM2NjEgOC45NzQ4MiA2MC42NjkgOC43NDUzMiA1OS44Nzc5IDguNzQ1MzJDNTkuMTMzNyA4Ljc0NTMyIDU4LjYyMTUgOC44ODMzMiA1OC4yNTAyIDkuMTU5MzNDNTcuODMxOSA5LjQzNTM0IDU3LjY0NTUgOS44MDQzNCA1Ny42NDU1IDEwLjI2NDlDNTcuNjQ1NSAxMC44MTY5IDU3Ljk3MTMgMTEuMjMyNCA1OC41NzYgMTEuNTUzNEM1OS4xODA3IDExLjgyOTQgNjAuMTExMyAxMi4xMDU0IDYxLjM2NzYgMTIuMzgxNEM2Mi44NTU5IDEyLjc1MDQgNjQuMDY1MiAxMy4xMTc5IDY0Ljk0ODggMTMuNDg2OUM2NS44NzkzIDEzLjg1NTkgNjYuNzE1OSAxNC40MDggNjcuNDE0NSAxNS4yMzZDNjguMTExNyAxNi4wNjQgNjguNDM3NSAxNy4xMjMgNjguNDg0NSAxOC40NTk2QzY4LjQ4NDUgMTkuNjEwMSA2OC4xNTg3IDIwLjY2OTEgNjcuNTA3IDIxLjU0MzZDNjYuODU1MyAyMi40NjQ3IDY1LjkyNDggMjMuMTU0NyA2NC43MTU0IDIzLjY2MTdDNjMuNTA2IDI0LjE2ODcgNjIuMDYzMiAyNC40NDQ3IDYwLjQ4MjYgMjQuNDQ0N0M1OC43NjA5IDI0LjQ0NDcgNTcuMjI1NyAyNC4xNjg3IDU1Ljg3NjkgMjMuNTcwMkg1NS44Nzg0WiIgZmlsbD0iIzE1MzBCQiI+PC9wYXRoPjxwYXRoIGQ9Ik03Ni4yMTA1IDQuNjA1NDdINzAuMTYzNlYyNC4xNzM1SDc2LjIxMDVWNC42MDU0N1oiIGZpbGw9IiMxNTMwQkIiPjwvcGF0aD48cGF0aCBkPSJNMTA5LjgxMiA2LjU4MjExQzExMS4zMDEgOC4wNTUxNSAxMTEuOTk5IDEwLjEyNjcgMTExLjk5OSAxMi43MDUzVjI0LjE3MDFIMTA1Ljk5OVYxMy41MzQ4QzEwNS45OTkgMTIuMjkxMyAxMDUuNjI3IDExLjI3ODcgMTA0Ljk3NiAxMC41ODg3QzEwNC4zMjUgOS44OTg3IDEwMy4zOTQgOS41NzYxOSAxMDIuMTg1IDkuNTc2MTlDMTAwLjk3NSA5LjU3NjE5IDEwMC4wOTIgOS44OTg3IDk5LjM5MzMgMTAuNTg4N0M5OC43NDE2IDExLjI3ODcgOTguNDE1OCAxMi4yOTI4IDk4LjQxNTggMTMuNTM0OFYyNC4xNzAxSDkyLjM2ODhWMTMuNTM0OEM5Mi4zNjg4IDEyLjI5MTMgOTIuMDQzIDExLjI3ODcgOTEuMzQ1OCAxMC41ODg3QzkwLjY5NDIgOS44OTg3IDg5Ljc2MzYgOS41NzYxOSA4OC41NTQzIDkuNTc2MTlDODcuMzQ0OSA5LjU3NjE5IDg2LjQ2MTMgOS44OTg3IDg1LjgwOTcgMTAuNTg4N0M4NS4xMTI1IDExLjI3ODcgODQuNzg2NyAxMi4yOTI4IDg0Ljc4NjcgMTMuNTM0OFYyNC4xNzAxSDc4LjczOTdWNC42MDIwNkg4NC43ODY3VjcuMDQyNjNDODUuMzkxNCA2LjIxNDYgODYuMTgyNSA1LjU2OTU5IDg3LjIwNTQgNS4xMDkwOEM4OC4xODMgNC42MDIwNiA4OS4yOTg0IDQuMzcyNTYgOTAuNTU0NyA0LjM3MjU2QzkyLjA0MyA0LjM3MjU2IDkzLjM5MTggNC42OTUwNyA5NC41NTU3IDUuMzQwMDhDOTUuNzE4MSA1LjkzODYgOTYuNjQ4NyA2Ljg1OTYyIDk3LjMwMDMgOC4wMTAxNUM5Ny45OTc1IDYuOTUxMTIgOTguOTI4IDYuMDc2NiAxMDAuMDkyIDUuMzg1MDhDMTAxLjMwMSA0LjY5NTA3IDEwMi41NTggNC4zNzI1NiAxMDMuOTUzIDQuMzcyNTZDMTA2LjQxOSA0LjM3MjU2IDEwOC4zNzMgNS4xMDkwOCAxMDkuODE0IDYuNTgyMTFIMTA5LjgxMloiIGZpbGw9IiMxNTMwQkIiPjwvcGF0aD48cGF0aCBkPSJNMTMuMTYzOCAxNy45OTlDMTQuMDAwNCAxNy4xNzEgMTQuNDIwMiAxNS45Mjc1IDE0LjQyMDIgMTQuMzYxNUMxNC40MjAyIDEyLjc5NTQgMTQuMDAxOSAxMS41OTg0IDEzLjIxMDggMTAuNzcwNEMxMi40MTk3IDkuODk1ODUgMTEuNDQzNyA5LjQ4MTg0IDEwLjI3OTggOS40ODE4NEM5LjExNTg2IDkuNDgxODQgOC4xMzk4NiA5Ljg5NTg1IDcuMzQ4NzYgMTAuNzI1NEM2LjU1NzY2IDExLjU1MzQgNi4xODYzNSAxMi43OTY5IDYuMTg2MzUgMTQuMzYzQzYuMTg2MzUgMTUuOTI5IDYuNTU5MTcgMTcuMTcxIDcuMzQ4NzYgMTguMDAwNUM4LjA5Mjg4IDE4LjgyODYgOS4wNzAzOSAxOS4yNDQxIDEwLjIzMjggMTkuMjQ0MUMxMS4zOTUyIDE5LjI0NDEgMTIuMzcyNyAxOC44MzAxIDEzLjE2MzggMTguMDAwNVYxNy45OTlaTTIwLjU1OTYgMjQuMTY4N0gxNC41MTI2VjIyLjYwMjdDMTMuNTgyMSAyMy42NjE3IDExLjc2OCAyNC4zOTgyIDkuOTA2OTYgMjQuNDQ0N0M4LjA0NTkgMjQuNDkxMiA2LjUxMDY4IDI0LjAzMDcgNC45NzU0NSAyMy4yMDEyQzMuNDQwMjMgMjIuNDE4MiAyLjIzMDg1IDIxLjIyMTEgMS4zNDczIDE5LjcwMTZDMC40NjUyNjUgMTguMTgzNiAwIDE2LjQzNDUgMCAxNC4zNjE1QzAgMTIuMjg4NCAwLjQ2NTI2NSAxMC41ODU5IDEuMzQ4ODEgOS4wNjYzM0MyLjIzMjM2IDcuNTQ2NzkgMy40ODg3MyA2LjM0OTc2IDUuMDIzOTUgNS41MjE3NEM2LjYwNjE1IDQuNjkzNzIgOC4zMjYyNyA0LjMyNDcxIDEwLjI3OTggNC4zMjQ3MUMxNi42NTI1IDQuMzI0NzEgMjAuNTU5NiA4LjYwNTgxIDIwLjU1OTYgMTUuMzc0VjI0LjE2NzJWMjQuMTY4N1oiIGZpbGw9IiMxNTMwQkIiPjwvcGF0aD48cGF0aCBkPSJNNDQuNzk2NCAzMi4xNjgxQzM5LjUzNzYgMzcuMzczMyAzMi42MDU2IDQwLjAwMTMgMjUuNzI1MSA0MC4wMDEzQzE4Ljg0NDcgNDAuMDAxMyAxMS45MTI3IDM3LjM3NDggNi42NTM4MSAzMi4xNjgxTDEwLjczMzYgMjguMDgyQzE0Ljg2MTkgMzIuMTY4MSAyMC4zMTkzIDM0LjIxMjcgMjUuNzI1MSAzNC4yMTI3QzMxLjEzMSAzNC4yMTI3IDM2LjUzODQgMzIuMTY5NiA0MC42NjgxIDI4LjA4Mkw0NC43OTY0IDMyLjE2ODFaIiBmaWxsPSIjNENEQTY0Ij48L3BhdGg+PHBhdGggZD0iTTUxLjkzNjQgMzEuMDcxN0M1Mi4yNDg2IDMwLjg5NDcgNTIuNjA0NyAzMC44MDYyIDUzLjAwNDggMzAuODA2MlYzMi4zNjkySDUyLjYwNzhDNTIuMTM0OSAzMi4zNjkyIDUxLjc3ODggMzIuNDc4NyA1MS41MzkzIDMyLjY5OTJDNTEuMjk5OSAzMi45MTk3IDUxLjE4MDIgMzMuMzAyMiA1MS4xODAyIDMzLjg0NjdWMzYuNzgwOEg0OS42NzY4VjMwLjg5MTdINTEuMTgwMlYzMS44MDY3QzUxLjM3NDEgMzEuNDk0NyA1MS42MjU3IDMxLjI1MDIgNTEuOTM3OSAzMS4wNzMyTDUxLjkzNjQgMzEuMDcxN1oiIGZpbGw9ImJsYWNrIj48L3BhdGg+PHBhdGggZD0iTTU1LjExMDcgMzYuNDk3MUM1NC42NTMgMzYuMjQ1MSA1NC4yOTIzIDM1Ljg4OTYgNTQuMDMxNyAzNS40MjkxQzUzLjc3MSAzNC45Njg2IDUzLjYzOTIgMzQuNDM3NSA1My42MzkyIDMzLjgzNDVDNTMuNjM5MiAzMy4yMzE1IDUzLjc3NCAzMi43MDA1IDU0LjA0MjMgMzIuMjRDNTQuMzEwNSAzMS43Nzk1IDU0LjY3NzMgMzEuNDIyNSA1NS4xNDI2IDMxLjE3MkM1NS42MDc4IDMwLjkxOTkgNTYuMTI3NiAzMC43OTM5IDU2LjcwMDUgMzAuNzkzOUM1Ny4yNzM0IDMwLjc5MzkgNTcuNzkxNyAzMC45MTk5IDU4LjI1ODUgMzEuMTcyQzU4LjcyMzcgMzEuNDI0IDU5LjA5MDUgMzEuNzc5NSA1OS4zNTg3IDMyLjI0QzU5LjYyNyAzMi43MDA1IDU5Ljc2MTkgMzMuMjMzIDU5Ljc2MTkgMzMuODM0NUM1OS43NjE5IDM0LjQzNiA1OS42MjM5IDM0Ljk2ODYgNTkuMzQ4MSAzNS40MjkxQzU5LjA3MjMgMzUuODg5NiA1OC42OTk1IDM2LjI0NjYgNTguMjMxMiAzNi40OTcxQzU3Ljc2MTQgMzYuNzQ5MSA1Ny4yMzcgMzYuODc1MSA1Ni42NTgxIDM2Ljg3NTFDNTYuMDc5MSAzNi44NzUxIDU1LjU2OTkgMzYuNzQ5MSA1NS4xMTA3IDM2LjQ5NzFaTTU3LjQyNDkgMzUuMzgxMUM1Ny42NjQ0IDM1LjI1MDYgNTcuODU2OSAzNS4wNTQxIDU3Ljk5OTMgMzQuNzkxNUM1OC4xNDE4IDM0LjUyOSA1OC4yMTQ1IDM0LjIxMSA1OC4yMTQ1IDMzLjgzNDVDNTguMjE0NSAzMy4yNzUgNTguMDY2IDMyLjg0NDUgNTcuNzY5IDMyLjU0M0M1Ny40NzE5IDMyLjI0MTUgNTcuMTA4MiAzMi4wOTE1IDU2LjY3OTMgMzIuMDkxNUM1Ni4yNTA0IDMyLjA5MTUgNTUuODg5NyAzMi4yNDE1IDU1LjYwMDIgMzIuNTQzQzU1LjMxMDggMzIuODQ0NSA1NS4xNjUzIDMzLjI3NSA1NS4xNjUzIDMzLjgzNDVDNTUuMTY1MyAzNC4zOTQgNTUuMzA2MiAzNC44MjQ1IDU1LjU4OTYgMzUuMTI2MUM1NS44NzMgMzUuNDI3NiA1Ni4yMjkyIDM1LjU3NzYgNTYuNjU4MSAzNS41Nzc2QzU2LjkyOTQgMzUuNTc3NiA1Ny4xODU1IDM1LjUxMTYgNTcuNDI2NCAzNS4zODExSDU3LjQyNDlaIiBmaWxsPSJibGFjayI+PC9wYXRoPjxwYXRoIGQ9Ik02MC44MzkyIDMyLjIyOTVDNjEuMDc4NiAzMS43NjkgNjEuNDA0NCAzMS40MTUgNjEuODE2NyAzMS4xNjZDNjIuMjI4OSAzMC45MTg1IDYyLjY4ODEgMzAuNzkzOSA2My4xOTczIDMwLjc5MzlDNjMuNjQxNCAzMC43OTM5IDY0LjAyOTMgMzAuODgyNCA2NC4zNjI3IDMxLjA1OTVDNjQuNjk2MiAzMS4yMzY1IDY0Ljk2MjkgMzEuNDYgNjUuMTYyOSAzMS43M1YzMC44ODk5SDY2LjY3NjlWMzYuNzc5MUg2NS4xNjI5VjM1LjkxODFDNjQuOTcwNSAzNi4xOTQxIDY0LjcwMjIgMzYuNDIzNiA2NC4zNjI3IDM2LjYwMzZDNjQuMDIzMyAzNi43ODUxIDYzLjYzMDcgMzYuODc1MSA2My4xODY3IDM2Ljg3NTFDNjIuNjg1MSAzNi44NzUxIDYyLjIyODkgMzYuNzQ3NiA2MS44MTY3IDM2LjQ5MjZDNjEuNDA0NCAzNi4yMzc2IDYxLjA3ODYgMzUuODc3NiA2MC44MzkyIDM1LjQxNDFDNjAuNTk5NyAzNC45NTA1IDYwLjQ4IDM0LjQxNjUgNjAuNDggMzMuODEzNUM2MC40OCAzMy4yMTA1IDYwLjU5OTcgMzIuNjkgNjAuODM5MiAzMi4yMjk1Wk02NC45NDc3IDMyLjkwNDVDNjQuODAzOCAzMi42NDY1IDY0LjYxMTMgMzIuNDQ3IDY0LjM2NzMgMzIuMzA5QzY0LjEyMzMgMzIuMTcxIDYzLjg2MjYgMzIuMTAyIDYzLjU4MzggMzIuMTAyQzYzLjMwNDkgMzIuMTAyIDYzLjA0NzMgMzIuMTY5NSA2Mi44MTA5IDMyLjMwNDVDNjIuNTc0NCAzMi40Mzk1IDYyLjM4MzUgMzIuNjM2IDYyLjIzNjUgMzIuODk0QzYyLjA4OTUgMzMuMTUzNSA2Mi4wMTY3IDMzLjQ1OTUgNjIuMDE2NyAzMy44MTM1QzYyLjAxNjcgMzQuMTY3NSA2Mi4wODk1IDM0LjQ3OCA2Mi4yMzY1IDM0Ljc0MzVDNjIuMzgzNSAzNS4wMDkxIDYyLjU3NTkgMzUuMjEzMSA2Mi44MTY5IDM1LjM1NDFDNjMuMDU2NCAzNS40OTY2IDYzLjMxMjUgMzUuNTY3MSA2My41ODUzIDM1LjU2NzFDNjMuODU4MSAzNS41NjcxIDY0LjEyNjMgMzUuNDk4MSA2NC4zNjg4IDM1LjM2MDFDNjQuNjEyOCAzNS4yMjIxIDY0LjgwNTMgMzUuMDI0MSA2NC45NDkyIDM0Ljc2NDVDNjUuMDkxNyAzNC41MDY1IDY1LjE2NDUgMzQuMTk2IDY1LjE2NDUgMzMuODM0NUM2NS4xNjQ1IDMzLjQ3MyA2NS4wOTMyIDMzLjE2MjUgNjQuOTQ5MiAzMi45MDQ1SDY0Ljk0NzdaIiBmaWxsPSJibGFjayI+PC9wYXRoPjxwYXRoIGQ9Ik03Ny4zMDQ2IDMxLjQ3MjJDNzcuNzUxNyAzMS45MTQ3IDc3Ljk3NiAzMi41MzQyIDc3Ljk3NiAzMy4zMjc3VjM2Ljc4MjNINzYuNDcyNlYzMy41Mjg3Qzc2LjQ3MjYgMzMuMDY4MiA3Ni4zNTQ0IDMyLjcxNTcgNzYuMTE4IDMyLjQ3MTJDNzUuODgxNiAzMi4yMjY3IDc1LjU1ODcgMzIuMTA1MiA3NS4xNTExIDMyLjEwNTJDNzQuNzQzNCAzMi4xMDUyIDc0LjQxOTEgMzIuMjI2NyA3NC4xNzk2IDMyLjQ3MTJDNzMuOTQwMiAzMi43MTU3IDczLjgyMDQgMzMuMDY4MiA3My44MjA0IDMzLjUyODdWMzYuNzgyM0g3Mi4zMTdWMzMuNTI4N0M3Mi4zMTcgMzMuMDY4MiA3Mi4xOTg4IDMyLjcxNTcgNzEuOTYyNCAzMi40NzEyQzcxLjcyNiAzMi4yMjY3IDcxLjQwMzIgMzIuMTA1MiA3MC45OTU1IDMyLjEwNTJDNzAuNTg3OCAzMi4xMDUyIDcwLjI1MjkgMzIuMjI2NyA3MC4wMTM1IDMyLjQ3MTJDNjkuNzc0IDMyLjcxNTcgNjkuNjU0MyAzMy4wNjgyIDY5LjY1NDMgMzMuNTI4N1YzNi43ODIzSDY4LjE1MDlWMzAuODkzMkg2OS42NTQzVjMxLjYwNTdDNjkuODQ4MyAzMS4zNTgyIDcwLjA5NjggMzEuMTYzMiA3MC40MDE0IDMxLjAyMDdDNzAuNzA2IDMwLjg3OTcgNzEuMDQxIDMwLjgwNzcgNzEuNDA2MiAzMC44MDc3QzcxLjg3MTUgMzAuODA3NyA3Mi4yODY3IDMwLjkwNTIgNzIuNjUyIDMxLjEwMDJDNzMuMDE3MiAzMS4yOTUyIDczLjMwMDYgMzEuNTcyNyA3My41MDA3IDMxLjkzNDJDNzMuNjk0NyAzMS41OTM3IDczLjk3NSAzMS4zMjA3IDc0LjM0MzMgMzEuMTE1MkM3NC43MTE2IDMwLjkwOTcgNzUuMTExNyAzMC44MDYyIDc1LjU0MDYgMzAuODA2MkM3Ni4yNzEgMzAuODA2MiA3Ni44NTkxIDMxLjAyODIgNzcuMzA3NyAzMS40NzA3TDc3LjMwNDYgMzEuNDcyMloiIGZpbGw9ImJsYWNrIj48L3BhdGg+PHBhdGggZD0iTTg0LjY4NzEgMzIuMTEyNUg4My42NDU5VjM2Ljc3OTFIODIuMTIxM1YzMi4xMTI1SDgxLjQ0MzhWMzAuODlIODIuMTIxM1YzMC41OTNDODIuMTIxMyAyOS44Njk5IDgyLjMyODkgMjkuMzM4OSA4Mi43NDQyIDI4Ljk5ODRDODMuMTU5NCAyOC42NTc5IDgzLjc4NTMgMjguNDk4OSA4NC42MjM0IDI4LjUxOTlWMjkuNzczOUM4NC4yNTgyIDI5Ljc2NjQgODQuMDAzNiAyOS44MjY0IDgzLjg2MTEgMjkuOTU1NEM4My43MTcxIDMwLjA4MjkgODMuNjQ1OSAzMC4zMTM5IDgzLjY0NTkgMzAuNjQ3VjMwLjg5MTVIODQuNjg3MVYzMi4xMTRWMzIuMTEyNVoiIGZpbGw9ImJsYWNrIj48L3BhdGg+PHBhdGggZD0iTTg3LjkyODEgMzEuMDcxN0M4OC4yNDAzIDMwLjg5NDcgODguNTk0OSAzMC44MDYyIDg4Ljk5NjUgMzAuODA2MlYzMi4zNjkySDg4LjU5OTVDODguMTI2NiAzMi4zNjkyIDg3Ljc3MDUgMzIuNDc4NyA4Ny41MzEgMzIuNjk5MkM4Ny4yOTE2IDMyLjkxOTcgODcuMTcxOSAzMy4zMDIyIDg3LjE3MTkgMzMuODQ2N1YzNi43ODA4SDg1LjY2ODVWMzAuODkxN0g4Ny4xNzE5VjMxLjgwNjdDODcuMzY1OCAzMS40OTQ3IDg3LjYxNzQgMzEuMjUwMiA4Ny45Mjk2IDMxLjA3MzJMODcuOTI4MSAzMS4wNzE3WiIgZmlsbD0iYmxhY2siPjwvcGF0aD48cGF0aCBkPSJNOTUuNDk0MyAzNC4yODE1SDkxLjE0NDhDOTEuMTgxMiAzNC43MDc1IDkxLjMzMTIgMzUuMDQwNiA5MS41OTY0IDM1LjI4MDZDOTEuODYxNiAzNS41MjIxIDkyLjE4NzUgMzUuNjQyMSA5Mi41NzM5IDM1LjY0MjFDOTMuMTMzMSAzNS42NDIxIDkzLjUzMDIgMzUuNDA1MSA5My43NjY2IDM0LjkyOTVIOTUuMzg4MkM5NS4yMTcgMzUuNDk2NiA5NC44ODY2IDM1Ljk2MzEgOTQuNDAwMSAzNi4zMjc2QzkzLjkxMzYgMzYuNjkyMSA5My4zMTUgMzYuODc1MSA5Mi42MDU3IDM2Ljg3NTFDOTIuMDMyOSAzNi44NzUxIDkxLjUxOTEgMzYuNzQ5MSA5MS4wNjQ1IDM2LjQ5NzFDOTAuNjA5OCAzNi4yNDUxIDkwLjI1NTIgMzUuODg5NiA5MC4wMDA2IDM1LjQyOTFDODkuNzQ1OSAzNC45Njg1IDg5LjYxODcgMzQuNDM3NSA4OS42MTg3IDMzLjgzNDVDODkuNjE4NyAzMy4yMzE1IDg5Ljc0NDQgMzIuNjkgODkuOTk0NSAzMi4yMjk1QzkwLjI0NDYgMzEuNzY5IDkwLjU5NjIgMzEuNDE1IDkxLjA0NzggMzEuMTY2QzkxLjQ5OTQgMzAuOTE4NCA5Mi4wMTc3IDMwLjc5MzkgOTIuNjA1NyAzMC43OTM5QzkzLjE5MzggMzAuNzkzOSA5My42Nzg3IDMwLjkxMzkgOTQuMTI1OCAzMS4xNTU1Qzk0LjU3MjkgMzEuMzk3IDk0LjkyMTUgMzEuNzM5IDk1LjE2NyAzMi4xODE1Qzk1LjQxNCAzMi42MjQgOTUuNTM4MyAzMy4xMzI1IDk1LjUzODMgMzMuNzA3Qzk1LjUzODMgMzMuOTIgOTUuNTIzMSAzNC4xMTA1IDk1LjQ5NTggMzQuMjgxNUg5NS40OTQzWk05My45ODAzIDMzLjI4MjVDOTMuOTcyNyAzMi45IDkzLjgzMzMgMzIuNTk0IDkzLjU2MiAzMi4zNjNDOTMuMjkwOCAzMi4xMzIgOTIuOTU3MyAzMi4wMTggOTIuNTYzMyAzMi4wMThDOTIuMTkwNSAzMi4wMTggOTEuODc4MyAzMi4xMjkgOTEuNjIzNyAzMi4zNTI1QzkxLjM2OTEgMzIuNTc2IDkxLjIxMyAzMi44ODY1IDkxLjE1NjkgMzMuMjgyNUg5My45ODE4SDkzLjk4MDNaIiBmaWxsPSJibGFjayI+PC9wYXRoPjxwYXRoIGQ9Ik0xMDIuMTIxIDM0LjI4MTVIOTcuNzcxMkM5Ny44MDc2IDM0LjcwNzUgOTcuOTU3NyAzNS4wNDA2IDk4LjIyMjkgMzUuMjgwNkM5OC40ODgxIDM1LjUyMjEgOTguODEzOSAzNS42NDIxIDk5LjIwMDQgMzUuNjQyMUM5OS43NTk2IDM1LjY0MjEgMTAwLjE1NyAzNS40MDUxIDEwMC4zOTMgMzQuOTI5NUgxMDIuMDE1QzEwMS44NDMgMzUuNDk2NiAxMDEuNTEzIDM1Ljk2MzEgMTAxLjAyNyAzNi4zMjc2QzEwMC41NCAzNi42OTIxIDk5Ljk0MTUgMzYuODc1MSA5OS4yMzIyIDM2Ljg3NTFDOTguNjU5MyAzNi44NzUxIDk4LjE0NTYgMzYuNzQ5MSA5Ny42OTA5IDM2LjQ5NzFDOTcuMjM2MyAzNi4yNDUxIDk2Ljg4MTYgMzUuODg5NiA5Ni42MjcgMzUuNDI5MUM5Ni4zNzI0IDM0Ljk2ODUgOTYuMjQ1MSAzNC40Mzc1IDk2LjI0NTEgMzMuODM0NUM5Ni4yNDUxIDMzLjIzMTUgOTYuMzcwOSAzMi42OSA5Ni42MjEgMzIuMjI5NUM5Ni44NzEgMzEuNzY5IDk3LjIyMjYgMzEuNDE1IDk3LjY3NDMgMzEuMTY2Qzk4LjEyNTkgMzAuOTE4NCA5OC42NDQyIDMwLjc5MzkgOTkuMjMyMiAzMC43OTM5Qzk5LjgyMDIgMzAuNzkzOSAxMDAuMzA1IDMwLjkxMzkgMTAwLjc1MiAzMS4xNTU1QzEwMS4xOTkgMzEuMzk3IDEwMS41NDggMzEuNzM5IDEwMS43OTMgMzIuMTgxNUMxMDIuMDQgMzIuNjI0IDEwMi4xNjUgMzMuMTMyNSAxMDIuMTY1IDMzLjcwN0MxMDIuMTY1IDMzLjkyIDEwMi4xNSAzNC4xMTA1IDEwMi4xMjIgMzQuMjgxNUgxMDIuMTIxWk0xMDAuNjA3IDMzLjI4MjVDMTAwLjU5OSAzMi45IDEwMC40NiAzMi41OTQgMTAwLjE4OSAzMi4zNjNDOTkuOTE1NyAzMi4xMzIgOTkuNTgzOCAzMi4wMTggOTkuMTg5OCAzMi4wMThDOTguODE3IDMyLjAxOCA5OC41MDQ4IDMyLjEyOSA5OC4yNTAyIDMyLjM1MjVDOTcuOTk1NSAzMi41NzYgOTcuODM5NCAzMi44ODY1IDk3Ljc4MzQgMzMuMjgyNUgxMDAuNjA4SDEwMC42MDdaIiBmaWxsPSJibGFjayI+PC9wYXRoPjxwYXRoIGQ9Ik0xMDQuNzYyIDI4LjkxMjFWMzYuNzc4M0gxMDMuMjU4VjI4LjkxMjFIMTA0Ljc2MloiIGZpbGw9ImJsYWNrIj48L3BhdGg+PHBhdGggZD0iTTExMS45MzUgMzAuODg5NkwxMDguMjUxIDM5LjU2NDRIMTA2LjY1TDEwNy45MzkgMzYuNjMwM0wxMDUuNTU1IDMwLjg4OTZIMTA3LjI0MUwxMDguNzc3IDM1LjAwNDNMMTEwLjMzNSAzMC44ODk2SDExMS45MzVaIiBmaWxsPSJibGFjayI+PC9wYXRoPjwvZz48ZGVmcz48Y2xpcFBhdGggaWQ9ImNsaXAwXzMwMTZfNDU5OSI+PHJlY3Qgd2lkdGg9IjExMiIgaGVpZ2h0PSI0MCIgZmlsbD0id2hpdGUiPjwvcmVjdD48L2NsaXBQYXRoPjwvZGVmcz48L3N2Zz4gCiAgICAKICAKICAgIDwvZGl2PgogICAgPGRpdiBjbGFzcz0iYWxvLWJsb2ctYmFubmVyX193cmFwcGVyIj4KICAgIDxkaXYgY2xhc3M9ImFsby1ibG9nLWJhbm5lcl9fY29udGVudCI+CiAgICAgICAgICAgICAgPGRpdiBjbGFzcz0iYWxvLWJsb2ctYmFubmVyX190aXRsZSI+PHAgY2xhc3M9InNrLXRleHQtLXgtbGFyZ2UiPjxzdHJvbmc+PHNwYW4gY2xhc3M9InNrLWNvbG9yLWJsYWNrIj5UcmF2ZWxsaW5nIHNvb24\/IFNhdmU8YnIgLz4KbW9uZXkgd2l0aCBvdXIgZnJlZSBhcHA8L3NwYW4+PC9zdHJvbmc+PC9wPgo8L2Rpdj4KICAgICAgCiAgICAgICAgICAgICAgPGRpdiBjbGFzcz0iYWxvLWJsb2ctYmFubmVyX19idXR0b25zIGlzLWRlc2siPgogICAgICAgICAgICA8ZGl2IGNsYXNzPSJidXR0b25zLWdyb3VwIGJ1dHRvbnMtZ3JvdXAtLWxlZnQiPgogICAgICAgICAgICAgICAgICA8YSBocmVmPSJodHRwczovL2Fsb3NpbS5vbmVsaW5rLm1lL05XUFkvYmxvZ2FwcCIgY2xhc3M9InNrLWJ0biBzay1idG4tLWFwcCAiIHRhcmdldD0iX3NlbGYiCiAgICAgdGl0bGU9IkFwcCBTdG9yZSI+CiAgICA8c3BhbiBjbGFzcz0ic2stYnRuLWlubmVyIj4KICAgICAgICAgIAoKCgoKCiAgICAgICAgICAgICAgICAgICAgICAKICAKICAKCiAgICAgICAgICAgICA8c3ZnIHhtbG5zPSJodHRwOi8vd3d3LnczLm9yZy8yMDAwL3N2ZyIgd2lkdGg9IjE1OCIgaGVpZ2h0PSI0MSIgdmlld0JveD0iMCAwIDE1OCA0MSIgZmlsbD0ibm9uZSI+PHBhdGggZD0iTTIzLjM3MTIgMTguOTgxOUMyMy4zODgyIDE3LjY0NjUgMjMuNzM4MyAxNi4zMzcxIDI0LjM4OTEgMTUuMTc1NkMyNS4wMzk5IDE0LjAxNCAyNS45NzAxIDEzLjAzODEgMjcuMDkzMiAxMi4zMzg2QzI2LjM3OTcgMTEuMzA2NCAyNS40Mzg1IDEwLjQ1NjkgMjQuMzQ0MiA5Ljg1NzZDMjMuMjQ5OSA5LjI1ODMyIDIyLjAzMjggOC45MjU3NyAyMC43ODk1IDguODg2MzZDMTguMTM3MiA4LjYwNDM0IDE1LjU2NiAxMC40OTQxIDE0LjIxNDUgMTAuNDk0MUMxMi44MzY4IDEwLjQ5NDEgMTAuNzU1OSA4LjkxNDM2IDguNTE1MTUgOC45NjEwNkM3LjA2NTc2IDkuMDA4NSA1LjY1MzIxIDkuNDM1NDcgNC40MTUxNCAxMC4yMDA0QzMuMTc3MDYgMTAuOTY1MyAyLjE1NTY5IDEyLjA0MiAxLjQ1MDUzIDEzLjMyNTdDLTEuNjA0MDcgMTguNjgzMSAwLjY3NDM4NSAyNi41NTY4IDMuNjAwNDQgMzAuODg3NEM1LjA2NDQgMzMuMDA3OSA2Ljc3NTM2IDM1LjM3NjcgOS4wMTQxMSAzNS4yOTI3QzExLjIwNDkgMzUuMjAwNiAxMi4wMjMxIDMzLjg3NzUgMTQuNjY3NSAzMy44Nzc1QzE3LjI4NzQgMzMuODc3NSAxOC4wNTUgMzUuMjkyNyAyMC4zMzkyIDM1LjIzOTNDMjIuNjkgMzUuMjAwNiAyNC4xNzExIDMzLjEwOTMgMjUuNTgzNyAzMC45Njg2QzI2LjYzNTUgMjkuNDU3NyAyNy40NDQ5IDI3Ljc4NzcgMjcuOTgxOSAyNi4wMjA2QzI2LjYxNjIgMjUuNDM1NCAyNS40NTA3IDI0LjQ1NiAyNC42MzA4IDIzLjIwNDNDMjMuODEwOSAyMS45NTI2IDIzLjM3MjggMjAuNDg0MSAyMy4zNzEyIDE4Ljk4MTlaIiBmaWxsPSJ3aGl0ZSI+PC9wYXRoPjxwYXRoIGQ9Ik0xOS4wNTY5IDYuMDM4MjRDMjAuMzM4NiA0LjQ3OTUxIDIwLjk3MDEgMi40NzYwMiAyMC44MTcyIDAuNDUzMjQ3QzE4Ljg1OSAwLjY2MTYgMTcuMDUwMSAxLjYwOTY5IDE1Ljc1MTEgMy4xMDg2MkMxNS4xMTU5IDMuODQwODkgMTQuNjI5NCA0LjY5Mjc5IDE0LjMxOTUgNS42MTU2MkMxNC4wMDk1IDYuNTM4NDUgMTMuODgyMiA3LjUxNDEyIDEzLjk0NDcgOC40ODY4NUMxNC45MjQxIDguNDk3MDYgMTUuODkzMSA4LjI4MiAxNi43Nzg2IDcuODU3ODZDMTcuNjY0MSA3LjQzMzcyIDE4LjQ0MzEgNi44MTE1NiAxOS4wNTY5IDYuMDM4MjRaIiBmaWxsPSJ3aGl0ZSI+PC9wYXRoPjxwYXRoIGQ9Ik01MS4wNjM5IDI5LjkyNDNINDMuNTg3OUw0MS43OTI1IDM1LjI5NDZIMzguNjI2TDQ1LjcwNzIgMTUuNDI1OEg0OC45OTcxTDU2LjA3ODMgMzUuMjk0Nkg1Mi44NTc3TDUxLjA2MzkgMjkuOTI0M1pNNDQuMzYyMiAyNy40NDYxSDUwLjI4ODJMNDcuMzY2OCAxOC43MzA1SDQ3LjI4NTFMNDQuMzYyMiAyNy40NDYxWiIgZmlsbD0id2hpdGUiPjwvcGF0aD48cGF0aCBkPSJNNzEuMzcxMiAyOC4wNTI0QzcxLjM3MTIgMzIuNTU0IDY4Ljk5MjggMzUuNDQ2MiA2NS40MDM3IDM1LjQ0NjJDNjQuNDk0NSAzNS40OTQzIDYzLjU5MDIgMzUuMjgyMiA2Mi43OTQ1IDM0LjgzNEM2MS45OTg4IDM0LjM4NTcgNjEuMzQzOCAzMy43MTk2IDYwLjkwNDUgMzIuOTExOEg2MC44MzY2VjQwLjA4NjhINTcuOTAxNFYyMC44MDg3SDYwLjc0MjVWMjMuMjE4SDYwLjc5NjVDNjEuMjU2IDIyLjQxNDEgNjEuOTIyMSAyMS43NTE0IDYyLjcyMzkgMjEuMzAwNEM2My41MjU3IDIwLjg0OTUgNjQuNDMzMSAyMC42MjcxIDY1LjM0OTcgMjAuNjU3MUM2OC45Nzg5IDIwLjY1NzEgNzEuMzcxMiAyMy41NjMzIDcxLjM3MTIgMjguMDUyNFpNNjguMzU0MyAyOC4wNTI0QzY4LjM1NDMgMjUuMTE5NiA2Ni44NTgxIDIzLjE5MTUgNjQuNTc1NCAyMy4xOTE1QzYyLjMzMjcgMjMuMTkxNSA2MC44MjQzIDI1LjE2MDIgNjAuODI0MyAyOC4wNTI0QzYwLjgyNDMgMzAuOTcxMiA2Mi4zMzI3IDMyLjkyNTkgNjQuNTc1NCAzMi45MjU5QzY2Ljg1ODIgMzIuOTI1OSA2OC4zNTQzIDMxLjAxMTggNjguMzU0MyAyOC4wNTI0WiIgZmlsbD0id2hpdGUiPjwvcGF0aD48cGF0aCBkPSJNODcuMTEgMjguMDUyNEM4Ny4xMSAzMi41NTQgODQuNzMxNiAzNS40NDYxIDgxLjE0MjQgMzUuNDQ2MUM4MC4yMzMyIDM1LjQ5NDMgNzkuMzI5IDM1LjI4MjIgNzguNTMzMyAzNC44MzM5Qzc3LjczNzYgMzQuMzg1NyA3Ny4wODI2IDMzLjcxOTYgNzYuNjQzMyAzMi45MTE3SDc2LjU3NTNWNDAuMDg2OEg3My42NDAxVjIwLjgwODZINzYuNDgxMlYyMy4yMThINzYuNTM1MkM3Ni45OTQ4IDIyLjQxNDEgNzcuNjYwOCAyMS43NTE0IDc4LjQ2MjYgMjEuMzAwNEM3OS4yNjQ0IDIwLjg0OTUgODAuMTcxOCAyMC42MjcxIDgxLjA4ODQgMjAuNjU3MUM4NC43MTc3IDIwLjY1NzEgODcuMTEgMjMuNTYzMyA4Ny4xMSAyOC4wNTI0Wk04NC4wOTMxIDI4LjA1MjRDODQuMDkzMSAyNS4xMTk2IDgyLjU5NjkgMjMuMTkxNSA4MC4zMTQyIDIzLjE5MTVDNzguMDcxNSAyMy4xOTE1IDc2LjU2MyAyNS4xNjAyIDc2LjU2MyAyOC4wNTI0Qzc2LjU2MyAzMC45NzEyIDc4LjA3MTUgMzIuOTI1OCA4MC4zMTQyIDMyLjkyNThDODIuNTk2OSAzMi45MjU4IDg0LjA5MzEgMzEuMDExOCA4NC4wOTMxIDI4LjA1MjRaIiBmaWxsPSJ3aGl0ZSI+PC9wYXRoPjxwYXRoIGQ9Ik05Ny41MTIgMjkuNzU4NkM5Ny43Mjk1IDMxLjcyODkgOTkuNjE4OSAzMy4wMjI2IDEwMi4yMDEgMzMuMDIyNkMxMDQuNjc1IDMzLjAyMjYgMTA2LjQ1NSAzMS43Mjg5IDEwNi40NTUgMjkuOTUyM0MxMDYuNDU1IDI4LjQxMDEgMTA1LjM4MSAyNy40ODY3IDEwMi44MzkgMjYuODUzOUwxMDAuMjk4IDI2LjIzMzZDOTYuNjk2MSAyNS4zNTIzIDk1LjAyNDEgMjMuNjQ2MSA5NS4wMjQxIDIwLjg3NzNDOTUuMDI0MSAxNy40NDkyIDk3Ljk3MzIgMTUuMDk0NSAxMDIuMTYxIDE1LjA5NDVDMTA2LjMwNSAxNS4wOTQ1IDEwOS4xNDYgMTcuNDQ5MiAxMDkuMjQyIDIwLjg3NzNIMTA2LjI3OUMxMDYuMTAyIDE4Ljg5NDUgMTA0LjQ4NCAxNy42OTc2IDEwMi4xMTkgMTcuNjk3NkM5OS43NTQ2IDE3LjY5NzYgOTguMTM2NiAxOC45MDg2IDk4LjEzNjYgMjAuNjcxMUM5OC4xMzY2IDIyLjA3NTcgOTkuMTcgMjIuOTAyMyAxMDEuNjk4IDIzLjUzNTFMMTAzLjg1OSAyNC4wNzI2QzEwNy44ODMgMjUuMDM2NiAxMDkuNTU1IDI2LjY3NDIgMTA5LjU1NSAyOS41ODA0QzEwOS41NTUgMzMuMjk3NiAxMDYuNjMyIDM1LjYyNTcgMTAxLjk4MyAzNS42MjU3Qzk3LjYzMzggMzUuNjI1NyA5NC42OTcgMzMuMzUyMiA5NC41MDczIDI5Ljc1ODVMOTcuNTEyIDI5Ljc1ODZaIiBmaWxsPSJ3aGl0ZSI+PC9wYXRoPjxwYXRoIGQ9Ik0xMTUuODkgMTcuMzgwNVYyMC44MDg2SDExOC42MDlWMjMuMTYzM0gxMTUuODlWMzEuMTQ5MkMxMTUuODkgMzIuMzg5OSAxMTYuNDM0IDMyLjk2OCAxMTcuNjI5IDMyLjk2OEMxMTcuOTUyIDMyLjk2MjMgMTE4LjI3NCAzMi45MzkzIDExOC41OTUgMzIuODk5MlYzNS4yMzk4QzExOC4wNTcgMzUuMzQxNSAxMTcuNTExIDM1LjM4NzYgMTE2Ljk2NSAzNS4zNzczQzExNC4wNyAzNS4zNzczIDExMi45NCAzNC4yNzU4IDExMi45NCAzMS40NjY0VjIzLjE2MzNIMTEwLjg2MVYyMC44MDg2SDExMi45NFYxNy4zODA1SDExNS44OVoiIGZpbGw9IndoaXRlIj48L3BhdGg+PHBhdGggZD0iTTEyMC4xODQgMjguMDUyNEMxMjAuMTg0IDIzLjQ5NDYgMTIyLjgzMyAyMC42MzA1IDEyNi45NjYgMjAuNjMwNUMxMzEuMTEyIDIwLjYzMDUgMTMzLjc0OSAyMy40OTQ1IDEzMy43NDkgMjguMDUyNEMxMzMuNzQ5IDMyLjYyMjcgMTMxLjEyNSAzNS40NzQyIDEyNi45NjYgMzUuNDc0MkMxMjIuODA3IDM1LjQ3NDIgMTIwLjE4NCAzMi42MjI3IDEyMC4xODQgMjguMDUyNFpNMTMwLjc1OCAyOC4wNTI0QzEzMC43NTggMjQuOTI1OCAxMjkuMzQ0IDIzLjA4MDUgMTI2Ljk2NiAyMy4wODA1QzEyNC41ODcgMjMuMDgwNSAxMjMuMTc0IDI0LjkzOTkgMTIzLjE3NCAyOC4wNTI0QzEyMy4xNzQgMzEuMTkxNCAxMjQuNTg3IDMzLjAyMjcgMTI2Ljk2NiAzMy4wMjI3QzEyOS4zNDQgMzMuMDIyNyAxMzAuNzU4IDMxLjE5MTQgMTMwLjc1OCAyOC4wNTI0WiIgZmlsbD0id2hpdGUiPjwvcGF0aD48cGF0aCBkPSJNMTM2LjE2OSAyMC44MDg2SDEzOC45NjhWMjMuMjc0MkgxMzkuMDM2QzEzOS4yMjYgMjIuNTA0MiAxMzkuNjcxIDIxLjgyMzcgMTQwLjI5NyAyMS4zNDdDMTQwLjkyNCAyMC44NzA0IDE0MS42OTMgMjAuNjI2OCAxNDIuNDc2IDIwLjY1NzFDMTQyLjgxNCAyMC42NTU5IDE0My4xNTEgMjAuNjkzMSAxNDMuNDgyIDIwLjc2OFYyMy41NDkzQzE0My4wNTUgMjMuNDE3MSAxNDIuNjA5IDIzLjM1NjQgMTQyLjE2MyAyMy4zNjk2QzE0MS43MzYgMjMuMzUyIDE0MS4zMTEgMjMuNDI4MiAxNDAuOTE3IDIzLjU5MjhDMTQwLjUyMiAyMy43NTc0IDE0MC4xNjcgMjQuMDA2NiAxMzkuODc3IDI0LjMyMzJDMTM5LjU4NiAyNC42Mzk5IDEzOS4zNjcgMjUuMDE2NCAxMzkuMjMzIDI1LjQyNzFDMTM5LjEgMjUuODM3OCAxMzkuMDU2IDI2LjI3MjggMTM5LjEwNCAyNi43MDI0VjM1LjI5NDZIMTM2LjE2OUwxMzYuMTY5IDIwLjgwODZaIiBmaWxsPSJ3aGl0ZSI+PC9wYXRoPjxwYXRoIGQ9Ik0xNTcuMDE1IDMxLjAzOTlDMTU2LjYyIDMzLjY2OTUgMTU0LjA5MiAzNS40NzQyIDE1MC44NTggMzUuNDc0MkMxNDYuNjk4IDM1LjQ3NDIgMTQ0LjExNiAzMi42NTA4IDE0NC4xMTYgMjguMTIxMUMxNDQuMTE2IDIzLjU3NzQgMTQ2LjcxMiAyMC42MzA1IDE1MC43MzQgMjAuNjMwNUMxNTQuNjkgMjAuNjMwNSAxNTcuMTc4IDIzLjM4MzYgMTU3LjE3OCAyNy43NzU4VjI4Ljc5NDZIMTQ3LjA3OVYyOC45NzQyQzE0Ny4wMzIgMjkuNTA3NCAxNDcuMDk4IDMwLjA0NDQgMTQ3LjI3MiAzMC41NDk4QzE0Ny40NDYgMzEuMDU1MSAxNDcuNzI0IDMxLjUxNzIgMTQ4LjA4OCAzMS45MDUyQzE0OC40NTIgMzIuMjkzMyAxNDguODkzIDMyLjU5ODUgMTQ5LjM4MiAzMi44MDA2QzE0OS44NzEgMzMuMDAyNyAxNTAuMzk3IDMzLjA5NyAxNTAuOTI1IDMzLjA3NzRDMTUxLjYxOSAzMy4xNDMyIDE1Mi4zMTUgMzIuOTgwNSAxNTIuOTEgMzIuNjEzNEMxNTMuNTA1IDMyLjI0NjIgMTUzLjk2NyAzMS42OTQ0IDE1NC4yMjggMzEuMDM5OUwxNTcuMDE1IDMxLjAzOTlaTTE0Ny4wOTMgMjYuNzE2NEgxNTQuMjQyQzE1NC4yNjggMjYuMjM3MSAxNTQuMTk2IDI1Ljc1NzQgMTU0LjAzMSAyNS4zMDc0QzE1My44NjYgMjQuODU3NSAxNTMuNjEgMjQuNDQ3IDE1My4yODEgMjQuMTAxOEMxNTIuOTUyIDIzLjc1NjYgMTUyLjU1NSAyMy40ODQxIDE1Mi4xMTcgMjMuMzAxM0MxNTEuNjc5IDIzLjExODYgMTUxLjIwOCAyMy4wMjk2IDE1MC43MzQgMjMuMDM5OUMxNTAuMjU2IDIzLjAzNyAxNDkuNzgyIDIzLjEzIDE0OS4zNCAyMy4zMTM2QzE0OC44OTggMjMuNDk3MiAxNDguNDk2IDIzLjc2NzcgMTQ4LjE1NyAyNC4xMDk1QzE0Ny44MTkgMjQuNDUxMyAxNDcuNTUgMjQuODU3NyAxNDcuMzY3IDI1LjMwNTFDMTQ3LjE4NSAyNS43NTI2IDE0Ny4wOTEgMjYuMjMyMiAxNDcuMDkzIDI2LjcxNjRaIiBmaWxsPSJ3aGl0ZSI+PC9wYXRoPjxwYXRoIGQ9Ik00My45OTM5IDAuNDcwNDI4QzQ0LjYwOTMgMC40MjU2OTMgNDUuMjI2OCAwLjUxOTg2OSA0NS44MDE5IDAuNzQ2MTYyQzQ2LjM3NyAwLjk3MjQ1NSA0Ni44OTUzIDEuMzI1MjIgNDcuMzE5NSAxLjc3OTAyQzQ3Ljc0MzcgMi4yMzI4MiA0OC4wNjMyIDIuNzc2MzQgNDguMjU1IDMuMzcwMzdDNDguNDQ2NyAzLjk2NDQxIDQ4LjUwNTkgNC41OTQxNSA0OC40MjgzIDUuMjE0MTdDNDguNDI4MyA4LjI2NDE3IDQ2LjgwMTEgMTAuMDE3NCA0My45OTM5IDEwLjAxNzRINDAuNTg5OFYwLjQ3MDQyOEg0My45OTM5Wk00Mi4wNTM2IDguNjY3MjNINDMuODMwNEM0NC4yNzAxIDguNjkzODUgNDQuNzEwMiA4LjYyMDgyIDQ1LjExODUgOC40NTM0NEM0NS41MjY5IDguMjg2MDUgNDUuODkzMiA4LjAyODUzIDQ2LjE5MDkgNy42OTk2M0M0Ni40ODg3IDcuMzcwNzMgNDYuNzEwMiA2Ljk3ODcxIDQ2LjgzOTUgNi41NTIxMkM0Ni45Njg4IDYuMTI1NTMgNDcuMDAyNiA1LjY3NTExIDQ2LjkzODQgNS4yMzM2M0M0Ni45OTc5IDQuNzkzODkgNDYuOTYwNyA0LjM0NjI2IDQ2LjgyOTQgMy45MjI4QzQ2LjY5ODIgMy40OTkzNCA0Ni40NzYxIDMuMTEwNTMgNDYuMTc5IDIuNzg0MjRDNDUuODgyIDIuNDU3OTUgNDUuNTE3NCAyLjIwMjI2IDQ1LjExMTQgMi4wMzU0OEM0NC43MDUzIDEuODY4NyA0NC4yNjc5IDEuNzk0OTcgNDMuODMwNCAxLjgxOTU2SDQyLjA1MzZWOC42NjcyM1oiIGZpbGw9IndoaXRlIj48L3BhdGg+PHBhdGggZD0iTTUwLjA4MTggNi40MTE3OUM1MC4wMzcxIDUuOTM4MzIgNTAuMDkwNSA1LjQ2MDYxIDUwLjIzODggNS4wMDkzQzUwLjM4NyA0LjU1Nzk5IDUwLjYyNjcgNC4xNDMwNCA1MC45NDI0IDMuNzkxMDdDNTEuMjU4MiAzLjQzOTEgNTEuNjQzMiAzLjE1Nzg3IDUyLjA3MjUgMi45NjU0M0M1Mi41MDE5IDIuNzcyOTkgNTIuOTY2MiAyLjY3MzU4IDUzLjQzNTcgMi42NzM1OEM1My45MDUzIDIuNjczNTggNTQuMzY5NiAyLjc3Mjk5IDU0Ljc5OSAyLjk2NTQzQzU1LjIyODMgMy4xNTc4NyA1NS42MTMyIDMuNDM5MSA1NS45MjkgMy43OTEwN0M1Ni4yNDQ4IDQuMTQzMDQgNTYuNDg0NSA0LjU1Nzk5IDU2LjYzMjcgNS4wMDkzQzU2Ljc4MDkgNS40NjA2MSA1Ni44MzQ0IDUuOTM4MzIgNTYuNzg5NyA2LjQxMTc5QzU2LjgzNTMgNi44ODU3NCA1Ni43ODI0IDcuMzY0MTEgNTYuNjM0NiA3LjgxNjE1QzU2LjQ4NjggOC4yNjgxOSA1Ni4yNDcyIDguNjgzOSA1NS45MzE0IDkuMDM2NTdDNTUuNjE1NSA5LjM4OTIzIDU1LjIzMDMgOS42NzEwNCA1NC44MDA1IDkuODYzOUM1NC4zNzA3IDEwLjA1NjggNTMuOTA1OCAxMC4xNTY0IDUzLjQzNTcgMTAuMTU2NEM1Mi45NjU3IDEwLjE1NjQgNTIuNTAwOCAxMC4wNTY4IDUyLjA3MSA5Ljg2MzlDNTEuNjQxMiA5LjY3MTA0IDUxLjI1NiA5LjM4OTIzIDUwLjk0MDEgOS4wMzY1N0M1MC42MjQyIDguNjgzOSA1MC4zODQ3IDguMjY4MTkgNTAuMjM2OSA3LjgxNjE1QzUwLjA4OTEgNy4zNjQxMSA1MC4wMzYyIDYuODg1NzQgNTAuMDgxOCA2LjQxMTc5Wk01NS4zNDYgNi40MTE3OUM1NS4zNDYgNC44NTAwOCA1NC42NTM1IDMuOTM2OCA1My40MzgxIDMuOTM2OEM1Mi4yMTggMy45MzY4IDUxLjUzMTcgNC44NTAwOCA1MS41MzE3IDYuNDExODFDNTEuNTMxNyA3Ljk4NjAzIDUyLjIxODEgOC44OTIyNyA1My40MzgxIDguODkyMjdDNTQuNjUzNSA4Ljg5MjI1IDU1LjM0NiA3Ljk3OTc2IDU1LjM0NiA2LjQxMTc5WiIgZmlsbD0id2hpdGUiPjwvcGF0aD48cGF0aCBkPSJNNjUuNzA2NSAxMC4wMTcySDY0LjI1MDVMNjIuNzgwNiA0LjcxMDkzSDYyLjY2OTVMNjEuMjA1OCAxMC4wMTcySDU5Ljc2MzZMNTcuODAzMiAyLjgxMjVINTkuMjI2OUw2MC41MDA5IDguMzEwMUg2MC42MDU4TDYyLjA2OCAyLjgxMjVINjMuNDE0NUw2NC44NzY3IDguMzEwMUg2NC45ODc3TDY2LjI1NTYgMi44MTI1SDY3LjY1OTJMNjUuNzA2NSAxMC4wMTcyWiIgZmlsbD0id2hpdGUiPjwvcGF0aD48cGF0aCBkPSJNNjkuMzA3NiAyLjgxMjU1SDcwLjY1ODhWMy45NTcwN0g3MC43NjM3QzcwLjk0MTYgMy41NDYgNzEuMjQxNyAzLjIwMTQxIDcxLjYyMjEgMi45NzEzMkM3Mi4wMDI2IDIuNzQxMjMgNzIuNDQ0NCAyLjYzNzExIDcyLjg4NiAyLjY3MzQ3QzczLjIzMiAyLjY0NzEyIDczLjU3OTUgMi42OTk5NyA3My45MDI3IDIuODI4MTNDNzQuMjI1OCAyLjk1NjI4IDc0LjUxNjQgMy4xNTY0NSA3NC43NTI4IDMuNDEzOEM3NC45ODkyIDMuNjcxMTUgNzUuMTY1NCAzLjk3OTA5IDc1LjI2ODQgNC4zMTQ4Qzc1LjM3MTQgNC42NTA1MSA3NS4zOTg1IDUuMDA1MzkgNzUuMzQ3NyA1LjM1MzE1VjEwLjAxNzJINzMuOTQ0MVY1LjcxMDIxQzczLjk0NDEgNC41NTI0IDczLjQ0NzQgMy45NzY2MSA3Mi40MDk0IDMuOTc2NjFDNzIuMTc0NCAzLjk2NTUzIDcxLjkzOTkgNC4wMDYwMyA3MS43MjE5IDQuMDk1MzZDNzEuNTAzOCA0LjE4NDY5IDcxLjMwNzQgNC4zMjA3MyA3MS4xNDYxIDQuNDk0MTRDNzAuOTg0OCA0LjY2NzU2IDcwLjg2MjQgNC44NzQyNSA3MC43ODc0IDUuMTAwMDZDNzAuNzEyMyA1LjMyNTg3IDcwLjY4NjMgNS41NjU0NSA3MC43MTEyIDUuODAyMzlWMTAuMDE3Mkg2OS4zMDc2TDY5LjMwNzYgMi44MTI1NVoiIGZpbGw9IndoaXRlIj48L3BhdGg+PHBhdGggZD0iTTc3LjU4NDUgMEg3OC45ODgxVjEwLjAxNzJINzcuNTg0NVYwWiIgZmlsbD0id2hpdGUiPjwvcGF0aD48cGF0aCBkPSJNODAuOTM5MiA2LjQxMThDODAuODk0NSA1LjkzODMgODAuOTQ4IDUuNDYwNTcgODEuMDk2MiA1LjAwOTI0QzgxLjI0NDUgNC41NTc5MSA4MS40ODQyIDQuMTQyOTUgODEuOCAzLjc5MDk3QzgyLjExNTkgMy40Mzg5OSA4Mi41MDA4IDMuMTU3NzYgODIuOTMwMiAyLjk2NTMyQzgzLjM1OTYgMi43NzI4NyA4My44MjQgMi42NzM0NiA4NC4yOTM1IDIuNjczNDZDODQuNzYzMSAyLjY3MzQ2IDg1LjIyNzQgMi43NzI4NyA4NS42NTY4IDIuOTY1MzJDODYuMDg2MiAzLjE1Nzc2IDg2LjQ3MTIgMy40Mzg5OSA4Ni43ODcgMy43OTA5N0M4Ny4xMDI4IDQuMTQyOTUgODcuMzQyNSA0LjU1NzkxIDg3LjQ5MDggNS4wMDkyNEM4Ny42MzkgNS40NjA1NyA4Ny42OTI1IDUuOTM4MyA4Ny42NDc5IDYuNDExOEM4Ny42OTM0IDYuODg1NzggODcuNjQwNSA3LjM2NDE1IDg3LjQ5MjYgNy44MTYxOUM4Ny4zNDQ3IDguMjY4MjMgODcuMTA1MiA4LjY4MzkzIDg2Ljc4OTMgOS4wMzY1OEM4Ni40NzMzIDkuMzg5MjMgODYuMDg4MSA5LjY3MTA0IDg1LjY1ODMgOS44NjM4OEM4NS4yMjg1IDEwLjA1NjcgODQuNzYzNiAxMC4xNTY0IDg0LjI5MzUgMTAuMTU2NEM4My44MjM0IDEwLjE1NjQgODMuMzU4NSAxMC4wNTY3IDgyLjkyODcgOS44NjM4OEM4Mi40OTg5IDkuNjcxMDQgODIuMTEzNyA5LjM4OTIzIDgxLjc5NzggOS4wMzY1OEM4MS40ODE5IDguNjgzOTMgODEuMjQyMyA4LjI2ODIzIDgxLjA5NDQgNy44MTYxOUM4MC45NDY1IDcuMzY0MTUgODAuODkzNyA2Ljg4NTc4IDgwLjkzOTIgNi40MTE4Wk04Ni4yMDM0IDYuNDExOEM4Ni4yMDM0IDQuODUwMDkgODUuNTEwOCAzLjkzNjgxIDg0LjI5NTQgMy45MzY4MUM4My4wNzU0IDMuOTM2ODEgODIuMzg5MSA0Ljg1MDA5IDgyLjM4OTEgNi40MTE4MkM4Mi4zODkxIDcuOTg2MDQgODMuMDc1NCA4Ljg5MjI4IDg0LjI5NTQgOC44OTIyOEM4NS41MTA4IDguODkyMjcgODYuMjAzNCA3Ljk3OTc3IDg2LjIwMzQgNi40MTE4WiIgZmlsbD0id2hpdGUiPjwvcGF0aD48cGF0aCBkPSJNODkuMTI1NSA3Ljk3OTdDODkuMTI1NSA2LjY4MjgyIDkwLjA3ODcgNS45MzUxNyA5MS43NzA3IDUuODI4OTJMOTMuNjk3MiA1LjcxNjQyVjUuMDk0NTVDOTMuNjk3MiA0LjMzMzYxIDkzLjIwMDUgMy45MDM5MyA5Mi4yNDExIDMuOTAzOTNDOTEuNDU3NiAzLjkwMzkzIDkwLjkxNDcgNC4xOTUzMyA5MC43NTg5IDQuNzA0NzFIODkuNEM4OS41NDM1IDMuNDY3MjEgOTAuNjkyNiAyLjY3MzQ2IDkyLjMwNTkgMi42NzM0NkM5NC4wODg5IDIuNjczNDYgOTUuMDk0NiAzLjU3MjY2IDk1LjA5NDYgNS4wOTQ1NVYxMC4wMTcySDkzLjc0MzRWOS4wMDQ3MUg5My42MzI0QzkzLjQwNyA5LjM2NzkgOTMuMDkwNSA5LjY2Mzk4IDkyLjcxNTIgOS44NjI3MUM5Mi4zMzk4IDEwLjA2MTUgOTEuOTE5MiAxMC4xNTU3IDkxLjQ5NjIgMTAuMTM1OUM5MS4xOTc2IDEwLjE2NzQgOTAuODk1OCAxMC4xMzUxIDkwLjYxMDMgMTAuMDQxMkM5MC4zMjQ4IDkuOTQ3MjcgOTAuMDYxOSA5Ljc5Mzc5IDg5LjgzODYgOS41OTA2M0M4OS42MTUyIDkuMzg3NDggODkuNDM2NCA5LjEzOTE3IDg5LjMxMzYgOC44NjE3MUM4OS4xOTA3IDguNTg0MjQgODkuMTI2NyA4LjI4Mzc5IDg5LjEyNTUgNy45Nzk3Wk05My42OTcyIDcuMzY0MDdWNi43NjE3M0w5MS45NjA0IDYuODc0MjNDOTAuOTgxIDYuOTQwNjMgOTAuNTM2OCA3LjI3ODEzIDkwLjUzNjggNy45MTMyOUM5MC41MzY4IDguNTYxNzIgOTEuMDkyIDguOTM5MDYgOTEuODU1NiA4LjkzOTA2QzkyLjA3OTMgOC45NjIgOTIuMzA1MyA4LjkzOTEyIDkyLjUyMDEgOC44NzE3OEM5Mi43MzQ5IDguODA0NDMgOTIuOTM0MiA4LjY5NCA5My4xMDYgOC41NDcwNkM5My4yNzc4IDguNDAwMTEgOTMuNDE4NyA4LjIxOTY1IDkzLjUyMDIgOC4wMTY0MkM5My42MjE4IDcuODEzMTkgOTMuNjgyIDcuNTkxMzQgOTMuNjk3MiA3LjM2NDA3WiIgZmlsbD0id2hpdGUiPjwvcGF0aD48cGF0aCBkPSJNOTYuOTM5NSA2LjQxMTc0Qzk2LjkzOTUgNC4xMzUxOCA5OC4wOTQ3IDIuNjkyOTkgOTkuODkxNiAyLjY5Mjk5QzEwMC4zMzYgMi42NzIyNSAxMDAuNzc3IDIuNzgwMDkgMTAxLjE2MyAzLjAwMzkyQzEwMS41NSAzLjIyNzc1IDEwMS44NjUgMy41NTgzMiAxMDIuMDczIDMuOTU2OTlIMTAyLjE3N1YwSDEwMy41ODFWMTAuMDE3MkgxMDIuMjM2VjguODc4OUgxMDIuMTI1QzEwMS45MDEgOS4yNzQ4OCAxMDEuNTc1IDkuNjAxMzQgMTAxLjE4MSA5LjgyMjkxQzEwMC43ODggMTAuMDQ0NSAxMDAuMzQyIDEwLjE1MjcgOTkuODkxNiAxMC4xMzU5Qzk4LjA4MjQgMTAuMTM2IDk2LjkzOTUgOC42OTM3OCA5Ni45Mzk1IDYuNDExNzRaTTk4LjM4OTQgNi40MTE3NEM5OC4zODk0IDcuOTM5ODcgOTkuMTAwNCA4Ljg1OTQxIDEwMC4yOSA4Ljg1OTQxQzEwMS40NzMgOC44NTk0MSAxMDIuMjA0IDcuOTI2NjEgMTAyLjIwNCA2LjQxOEMxMDIuMjA0IDQuOTE2NDMgMTAxLjQ2NSAzLjk3MDM0IDEwMC4yOSAzLjk3MDM0Qzk5LjEwODEgMy45NzAzNCA5OC4zODk0IDQuODk2MTEgOTguMzg5NCA2LjQxMTc0WiIgZmlsbD0id2hpdGUiPjwvcGF0aD48cGF0aCBkPSJNMTA5LjM4OCA2LjQxMTc5QzEwOS4zNDMgNS45MzgzMiAxMDkuMzk3IDUuNDYwNjEgMTA5LjU0NSA1LjAwOTNDMTA5LjY5MyA0LjU1Nzk5IDEwOS45MzMgNC4xNDMwNCAxMTAuMjQ5IDMuNzkxMDdDMTEwLjU2NCAzLjQzOTEgMTEwLjk0OSAzLjE1Nzg3IDExMS4zNzkgMi45NjU0M0MxMTEuODA4IDIuNzcyOTkgMTEyLjI3MiAyLjY3MzU4IDExMi43NDIgMi42NzM1OEMxMTMuMjExIDIuNjczNTggMTEzLjY3NiAyLjc3Mjk5IDExNC4xMDUgMi45NjU0M0MxMTQuNTM0IDMuMTU3ODcgMTE0LjkxOSAzLjQzOTEgMTE1LjIzNSAzLjc5MTA3QzExNS41NTEgNC4xNDMwNCAxMTUuNzkxIDQuNTU3OTkgMTE1LjkzOSA1LjAwOTNDMTE2LjA4NyA1LjQ2MDYxIDExNi4xNDEgNS45MzgzMiAxMTYuMDk2IDYuNDExNzlDMTE2LjE0MSA2Ljg4NTc0IDExNi4wODkgNy4zNjQxMSAxMTUuOTQxIDcuODE2MTVDMTE1Ljc5MyA4LjI2ODE5IDExNS41NTMgOC42ODM5IDExNS4yMzggOS4wMzY1N0MxMTQuOTIyIDkuMzg5MjMgMTE0LjUzNiA5LjY3MTA0IDExNC4xMDcgOS44NjM5QzExMy42NzcgMTAuMDU2OCAxMTMuMjEyIDEwLjE1NjQgMTEyLjc0MiAxMC4xNTY0QzExMi4yNzIgMTAuMTU2NCAxMTEuODA3IDEwLjA1NjggMTExLjM3NyA5Ljg2MzlDMTEwLjk0NyA5LjY3MTA0IDExMC41NjIgOS4zODkyMyAxMTAuMjQ2IDkuMDM2NTdDMTA5LjkzIDguNjgzOSAxMDkuNjkxIDguMjY4MTkgMTA5LjU0MyA3LjgxNjE1QzEwOS4zOTUgNy4zNjQxMSAxMDkuMzQyIDYuODg1NzQgMTA5LjM4OCA2LjQxMTc5Wk0xMTQuNjUyIDYuNDExNzlDMTE0LjY1MiA0Ljg1MDA4IDExMy45NiAzLjkzNjggMTEyLjc0NCAzLjkzNjhDMTExLjUyNCAzLjkzNjggMTEwLjgzOCA0Ljg1MDA4IDExMC44MzggNi40MTE4MUMxMTAuODM4IDcuOTg2MDMgMTExLjUyNCA4Ljg5MjI3IDExMi43NDQgOC44OTIyN0MxMTMuOTYgOC44OTIyNSAxMTQuNjUyIDcuOTc5NzYgMTE0LjY1MiA2LjQxMTc5WiIgZmlsbD0id2hpdGUiPjwvcGF0aD48cGF0aCBkPSJNMTE3Ljk3OSAyLjgxMjU1SDExOS4zM1YzLjk1NzA3SDExOS40MzVDMTE5LjYxMyAzLjU0NiAxMTkuOTEzIDMuMjAxNDEgMTIwLjI5NCAyLjk3MTMyQzEyMC42NzQgMi43NDEyMyAxMjEuMTE2IDIuNjM3MTEgMTIxLjU1NyAyLjY3MzQ3QzEyMS45MDMgMi42NDcxMiAxMjIuMjUxIDIuNjk5OTcgMTIyLjU3NCAyLjgyODEzQzEyMi44OTcgMi45NTYyOCAxMjMuMTg4IDMuMTU2NDUgMTIzLjQyNCAzLjQxMzhDMTIzLjY2MSAzLjY3MTE1IDEyMy44MzcgMy45NzkwOSAxMjMuOTQgNC4zMTQ4QzEyNC4wNDMgNC42NTA1MSAxMjQuMDcgNS4wMDUzOSAxMjQuMDE5IDUuMzUzMTVWMTAuMDE3MkgxMjIuNjE1VjUuNzEwMjFDMTIyLjYxNSA0LjU1MjQgMTIyLjExOSAzLjk3NjYxIDEyMS4wODEgMy45NzY2MUMxMjAuODQ2IDMuOTY1NTMgMTIwLjYxMSA0LjAwNjAzIDEyMC4zOTMgNC4wOTUzNkMxMjAuMTc1IDQuMTg0NjkgMTE5Ljk3OSA0LjMyMDczIDExOS44MTcgNC40OTQxNEMxMTkuNjU2IDQuNjY3NTYgMTE5LjUzNCA0Ljg3NDI1IDExOS40NTkgNS4xMDAwNkMxMTkuMzg0IDUuMzI1ODcgMTE5LjM1OCA1LjU2NTQ1IDExOS4zODMgNS44MDIzOVYxMC4wMTcySDExNy45NzlWMi44MTI1NVoiIGZpbGw9IndoaXRlIj48L3BhdGg+PHBhdGggZD0iTTEzMS45NSAxLjAxODhWMi44NDUzNkgxMzMuNDkxVjQuMDQzMDJIMTMxLjk1VjcuNzQ3NzFDMTMxLjk1IDguNTAyNCAxMzIuMjU3IDguODMyODYgMTMyLjk1NiA4LjgzMjg2QzEzMy4xMzUgOC44MzIyOCAxMzMuMzEzIDguODIxMzMgMTMzLjQ5MSA4LjgwMDA1VjkuOTg0NDJDMTMzLjIzOSAxMC4wMzAxIDEzMi45ODQgMTAuMDU0NCAxMzIuNzI4IDEwLjA1NzFDMTMxLjE2NyAxMC4wNTcxIDEzMC41NDUgOS41MDA4MSAxMzAuNTQ1IDguMTExNzZWNC4wNDI5NkgxMjkuNDE2VjIuODQ1MjlIMTMwLjU0NVYxLjAxODhIMTMxLjk1WiIgZmlsbD0id2hpdGUiPjwvcGF0aD48cGF0aCBkPSJNMTM1LjQwOCAwSDEzNi43OTlWMy45NzAzMkgxMzYuOTFDMTM3LjA5NyAzLjU1NTQxIDEzNy40MDUgMy4yMDg4NiAxMzcuNzkzIDIuOTc3OTFDMTM4LjE4MiAyLjc0Njk1IDEzOC42MyAyLjY0MjgyIDEzOS4wNzkgMi42Nzk3QzEzOS40MjMgMi42NjA3MiAxMzkuNzY3IDIuNzE4OTQgMTQwLjA4NyAyLjg1MDIxQzE0MC40MDYgMi45ODE0OCAxNDAuNjkzIDMuMTgyNTUgMTQwLjkyNyAzLjQzOTA5QzE0MS4xNjEgMy42OTU2MyAxNDEuMzM2IDQuMDAxMzIgMTQxLjQ0IDQuMzM0MzNDMTQxLjU0NCA0LjY2NzM1IDE0MS41NzQgNS4wMTk0OSAxNDEuNTI4IDUuMzY1NjNWMTAuMDE3MkgxNDAuMTIzVjUuNzE2NEMxNDAuMTIzIDQuNTY1NjIgMTM5LjU5NCAzLjk4MjggMTM4LjYwMyAzLjk4MjhDMTM4LjM2MSAzLjk2Mjc2IDEzOC4xMTkgMy45OTYzNSAxMzcuODkyIDQuMDgxMjRDMTM3LjY2NSA0LjE2NjEzIDEzNy40NTggNC4zMDAyNSAxMzcuMjg4IDQuNDc0MjNDMTM3LjExNyA0LjY0ODIxIDEzNi45ODYgNC44NTc4NCAxMzYuOTA0IDUuMDg4NDZDMTM2LjgyMiA1LjMxOTA4IDEzNi43OSA1LjU2NTEyIDEzNi44MTIgNS44MDkzNlYxMC4wMTcySDEzNS40MDhMMTM1LjQwOCAwWiIgZmlsbD0id2hpdGUiPjwvcGF0aD48cGF0aCBkPSJNMTQ5LjcxMyA4LjA3MTg5QzE0OS41MjIgOC43MzAzNiAxNDkuMTA5IDkuMjk5OTMgMTQ4LjU0NiA5LjY4MDk3QzE0Ny45ODIgMTAuMDYyIDE0Ny4zMDUgMTAuMjMwMyAxNDYuNjMxIDEwLjE1NjNDMTQ2LjE2MyAxMC4xNjg4IDE0NS42OTcgMTAuMDc3OSAxNDUuMjY2IDkuODg5ODNDMTQ0LjgzNiA5LjcwMTc5IDE0NC40NTEgOS40MjExMSAxNDQuMTM5IDkuMDY3MjlDMTQzLjgyNiA4LjcxMzQ3IDE0My41OTMgOC4yOTQ5OCAxNDMuNDU2IDcuODQwODdDMTQzLjMxOSA3LjM4Njc1IDE0My4yODIgNi45MDc4OSAxNDMuMzQ2IDYuNDM3NTJDMTQzLjI4MyA1Ljk2NTcxIDE0My4zMjIgNS40ODU4MiAxNDMuNDU4IDUuMDMwMzRDMTQzLjU5NSA0LjU3NDg2IDE0My44MjcgNC4xNTQ0NCAxNDQuMTM4IDMuNzk3NTJDMTQ0LjQ0OCAzLjQ0MDYgMTQ0LjgzMSAzLjE1NTUzIDE0NS4yNjEgMi45NjE2QzE0NS42OSAyLjc2NzY2IDE0Ni4xNTUgMi42Njk0IDE0Ni42MjUgMi42NzM0NkMxNDguNjA0IDIuNjczNDYgMTQ5Ljc5OCA0LjA0MzA2IDE0OS43OTggNi4zMDU0NlY2LjgwMTZIMTQ0Ljc3NlY2Ljg4MTI4QzE0NC43NTQgNy4xNDU2OCAxNDQuNzg2IDcuNDExODEgMTQ0Ljg3MiA3LjY2MjYxQzE0NC45NTcgNy45MTM0IDE0NS4wOTQgOC4xNDMzNCAxNDUuMjcyIDguMzM3NjdDMTQ1LjQ1IDguNTMyIDE0NS42NjcgOC42ODY0MyAxNDUuOTA3IDguNzkxMDdDMTQ2LjE0OCA4Ljg5NTcgMTQ2LjQwOCA4Ljk0ODIzIDE0Ni42NyA4Ljk0NTI4QzE0Ny4wMDUgOC45ODYxMSAxNDcuMzQ2IDguOTI0ODcgMTQ3LjY0NyA4Ljc2OTM0QzE0Ny45NDggOC42MTM4MSAxNDguMTk3IDguMzcxMDIgMTQ4LjM2MiA4LjA3MTg0TDE0OS43MTMgOC4wNzE4OVpNMTQ0Ljc3NiA1Ljc1MDAySDE0OC4zNjhDMTQ4LjM4NSA1LjUwODIyIDE0OC4zNTMgNS4yNjUzNCAxNDguMjczIDUuMDM2OTlDMTQ4LjE5MiA0LjgwODY0IDE0OC4wNjUgNC41OTk4NyAxNDcuOSA0LjQyNDFDMTQ3LjczNiA0LjI0ODMzIDE0Ny41MzYgNC4xMDk0NCAxNDcuMzE1IDQuMDE2MzZDMTQ3LjA5NCAzLjkyMzI4IDE0Ni44NTYgMy44NzgwNiAxNDYuNjE3IDMuODgzNjJDMTQ2LjM3NCAzLjg4MDUzIDE0Ni4xMzMgMy45MjY3IDE0NS45MDkgNC4wMTk0MUMxNDUuNjg0IDQuMTEyMTMgMTQ1LjQ3OSA0LjI0OTUgMTQ1LjMwOCA0LjQyMzQ0QzE0NS4xMzYgNC41OTczOCAxNDUuMDAxIDQuODA0MzcgMTQ0LjkwOSA1LjAzMjJDMTQ0LjgxOCA1LjI2MDA0IDE0NC43NzIgNS41MDQxIDE0NC43NzYgNS43NTAwMloiIGZpbGw9IndoaXRlIj48L3BhdGg+PC9zdmc+IAogICAgCiAgCiAgICAgICAgPC9zcGFuPgogIDwvYT4KCiAgICAgICAgICAgICAgICAgIDxhIGhyZWY9Imh0dHBzOi8vYWxvc2ltLm9uZWxpbmsubWUvTldQWS9ibG9nZ29vIiBjbGFzcz0ic2stYnRuIHNrLWJ0bi0tYXBwICIgdGFyZ2V0PSJfc2VsZiIKICAgICB0aXRsZT0iR29vZ2xlIFBsYXkiPgogICAgPHNwYW4gY2xhc3M9InNrLWJ0bi1pbm5lciI+CiAgICAgICAgICAKCgoKCgogICAgICAgICAgICAgICAgICAgICAgCiAgCiAgCgogICAgICAgICAgICAgPHN2ZyB4bWxucz0iaHR0cDovL3d3dy53My5vcmcvMjAwMC9zdmciIHdpZHRoPSIxNzMiIGhlaWdodD0iNDEiIHZpZXdCb3g9IjAgMCAxNzMgNDEiIGZpbGw9Im5vbmUiPjxwYXRoIGQ9Ik01NS44MDE1IDUuMDk2NjVDNTUuODAxNSA2LjMzMTIzIDU1LjQzMTQgNy4zMjM4OSA1NC42OTEyIDguMDU3OTZDNTMuODUgOC45MzM4NCA1Mi43NTY1IDkuMzY3NjEgNTEuNDEwNyA5LjM2NzYxQzUwLjA2NDkgOS4zNjc2MSA0OS4wMjE4IDguOTI1NSA0OC4xMjE4IDguMDQxMjhDNDcuMjIxOCA3LjE1NzA2IDQ2Ljc2NzYgNi4wNTU5NSA0Ni43Njc2IDQuNzM3OTZDNDYuNzY3NiAzLjQxOTk3IDQ3LjIyMTggMi4zMjcyMSA0OC4xMjE4IDEuNDM0NjVDNDkuMDIxOCAwLjU1MDQyOCA1MC4xMjM3IDAuMDk5OTc1NiA1MS40MTA3IDAuMDk5OTc1NkM1Mi4wNSAwLjA5OTk3NTYgNTIuNjY0IDAuMjI1MTAyIDUzLjI0NDQgMC40NjcwMTFDNTMuODI0OCAwLjcxNzI2MiA1NC4yOTU4IDEuMDQyNTkgNTQuNjQwNyAxLjQ1OTY3TDUzLjg1ODQgMi4yNDM3OUM1My4yNjk2IDEuNTQzMDkgNTIuNDUzNyAxLjE5Mjc0IDUxLjQxMDcgMS4xOTI3NEM1MC40Njg2IDEuMTkyNzQgNDkuNjUyNyAxLjUxODA2IDQ4Ljk3MTQgMi4xNzcwNkM0OC4yOSAyLjgzNjA1IDQ3Ljk0NTIgMy42ODY5MSA0Ny45NDUyIDQuNzI5NjJDNDcuOTQ1MiA1Ljc3MjMzIDQ4LjI5IDYuNjMxNTMgNDguOTcxNCA3LjI4MjE4QzQ5LjY2MTEgNy45NDExOCA1MC40Njg2IDguMjY2NSA1MS40MTA3IDguMjY2NUM1Mi40MTE3IDguMjY2NSA1My4yNDQ0IDcuOTMyODMgNTMuOTA4OSA3LjI3Mzg0QzU0LjMzNzkgNi44NDAwNyA1NC41OTAyIDYuMjQ3ODEgNTQuNjU3NSA1LjQ4MDM3SDUxLjQxMDdWNC40MTI2NEg1NS43NDI2QzU1Ljc4NDcgNC42NDYyIDU1LjgwMTUgNC44NjMwOSA1NS44MDE1IDUuMDc5OTdWNS4wOTY2NVoiIGZpbGw9IndoaXRlIiBzdHJva2U9IndoaXRlIiBzdHJva2Utd2lkdGg9IjAuMiIgc3Ryb2tlLW1pdGVybGltaXQ9IjEwIj48L3BhdGg+PHBhdGggZD0iTTYyLjY3MzcgMS4zOTMwMkg1OC42MDI2VjQuMjA0MTdINjIuMjc4NFY1LjI3MTkxSDU4LjYwMjZWOC4wODMwNkg2Mi42NzM3VjkuMTc1ODJINTcuNDUwMlYwLjMwODU5NEg2Mi42NzM3VjEuNDAxMzZWMS4zOTMwMloiIGZpbGw9IndoaXRlIiBzdHJva2U9IndoaXRlIiBzdHJva2Utd2lkdGg9IjAuMiIgc3Ryb2tlLW1pdGVybGltaXQ9IjEwIj48L3BhdGg+PHBhdGggZD0iTTY3LjUxODcgOS4xNjc0SDY2LjM2NjRWMS4zOTI5M0g2My44NjgyVjAuMzAwMTcxSDcwLjAwODVWMS4zOTI5M0g2Ny41MTAzVjkuMTY3NEg2Ny41MTg3WiIgZmlsbD0id2hpdGUiIHN0cm9rZT0id2hpdGUiIHN0cm9rZS13aWR0aD0iMC4yIiBzdHJva2UtbWl0ZXJsaW1pdD0iMTAiPjwvcGF0aD48cGF0aCBkPSJNNzQuNDU4IDkuMTY3NFYwLjMwMDE3MUg3NS42MDJWOS4xNjc0SDc0LjQ1OFoiIGZpbGw9IndoaXRlIiBzdHJva2U9IndoaXRlIiBzdHJva2Utd2lkdGg9IjAuMiIgc3Ryb2tlLW1pdGVybGltaXQ9IjEwIj48L3BhdGg+PHBhdGggZD0iTTgwLjcwNzcgOS4xNjc0SDc5LjU1NTNWMS4zOTI5M0g3Ny4wNTcxVjAuMzAwMTcxSDgzLjE5NzVWMS4zOTI5M0g4MC42OTkzVjkuMTY3NEg4MC43MDc3WiIgZmlsbD0id2hpdGUiIHN0cm9rZT0id2hpdGUiIHN0cm9rZS13aWR0aD0iMC4yIiBzdHJva2UtbWl0ZXJsaW1pdD0iMTAiPjwvcGF0aD48cGF0aCBkPSJNOTQuODMwNyA4LjAyNDhDOTMuOTQ3NSA4LjkyNTcgOTIuODYyNSA5LjM2NzgxIDkxLjU1MDMgOS4zNjc4MUM5MC4yMzgxIDkuMzY3ODEgODkuMTUzIDguOTE3MzYgODguMjY5OCA4LjAyNDhDODcuMzg2NiA3LjEzMjIzIDg2Ljk0OTIgNi4wMzExMyA4Ni45NDkyIDQuNzM4MTZDODYuOTQ5MiAzLjQ0NTIgODcuMzg2NiAyLjM0NDEgODguMjY5OCAxLjQ1MTUzQzg5LjE0NDYgMC41NTA2MyA5MC4yMzgxIDAuMTA4NTIxIDkxLjU1MDMgMC4xMDg1MjFDOTIuODYyNSAwLjEwODUyMSA5My45MzkxIDAuNTU4OTcyIDk0LjgyMjMgMS40NTk4OEM5NS43MDU1IDIuMzYwNzggOTYuMTQyOSAzLjQ1MzU0IDk2LjE0MjkgNC43MzgxNkM5Ni4xNDI5IDYuMDIyNzkgOTUuNzA1NSA3LjEzMjIzIDk0LjgyMjMgOC4wMjQ4SDk0LjgzMDdaTTg5LjEyNzggNy4yODIzOEM4OS43OTIzIDcuOTQ5NzIgOTAuNTk5OCA4LjI3NTA1IDkxLjU1ODcgOC4yNzUwNUM5Mi41MTc2IDguMjc1MDUgOTMuMzI1MSA3Ljk0MTM4IDkzLjk4OTYgNy4yODIzOEM5NC42NTQxIDYuNjE1MDUgOTQuOTgyMSA1Ljc3MjU0IDk0Ljk4MjEgNC43MzgxNkM5NC45ODIxIDMuNzAzNzkgOTQuNjQ1NyAyLjg1Mjk0IDkzLjk4OTYgMi4xOTM5NUM5My4zMzM1IDEuNTI2NjEgOTIuNTE3NiAxLjIwMTI4IDkxLjU1ODcgMS4yMDEyOEM5MC41OTk4IDEuMjAxMjggODkuNzkyMyAxLjUzNDk1IDg5LjEyNzggMi4xOTM5NUM4OC40NzE3IDIuODYxMjggODguMTM1MiAzLjcwMzc5IDg4LjEzNTIgNC43MzgxNkM4OC4xMzUyIDUuNzcyNTQgODguNDcxNyA2LjYyMzM5IDg5LjEyNzggNy4yODIzOFoiIGZpbGw9IndoaXRlIiBzdHJva2U9IndoaXRlIiBzdHJva2Utd2lkdGg9IjAuMiIgc3Ryb2tlLW1pdGVybGltaXQ9IjEwIj48L3BhdGg+PHBhdGggZD0iTTk3Ljc2NjIgOS4xNjc0VjAuMzAwMTcxSDk5LjE2MjVMMTAzLjUxMSA3LjE5ODc2SDEwMy41NjJMMTAzLjUxMSA1LjQ4ODcxVjAuMzAwMTcxSDEwNC42NjRWOS4xNjc0SDEwMy40NjFMOTguOTEwMiAxLjkzNTE0SDk4Ljg1OTdMOTguOTEwMiAzLjY0NTE5VjkuMTY3NEg5Ny43NTc4SDk3Ljc2NjJaIiBmaWxsPSJ3aGl0ZSIgc3Ryb2tlPSJ3aGl0ZSIgc3Ryb2tlLXdpZHRoPSIwLjIiIHN0cm9rZS1taXRlcmxpbWl0PSIxMCI+PC9wYXRoPjxwYXRoIGQ9Ik04Ni42ODAxIDIyLjEwNTRDODMuMTcyNiAyMi4xMDU0IDgwLjMyMTEgMjQuNzQ5NyA4MC4zMjExIDI4LjM4NjdDODAuMzIxMSAzMi4wMjM3IDgzLjE4MSAzNC42NjggODYuNjgwMSAzNC42NjhDOTAuMTc5MyAzNC42NjggOTMuMDM5MiAzMS45OTg3IDkzLjAzOTIgMjguMzg2N0M5My4wMzkyIDI0Ljc3NDggOTAuMTc5MyAyMi4xMDU0IDg2LjY4MDEgMjIuMTA1NFpNODYuNjgwMSAzMi4xOTg5Qzg0Ljc2MjMgMzIuMTk4OSA4My4xMDUzIDMwLjYzMDYgODMuMTA1MyAyOC4zODY3QzgzLjEwNTMgMjYuMTQyOCA4NC43NjIzIDI0LjU3NDYgODYuNjgwMSAyNC41NzQ2Qzg4LjU5NzkgMjQuNTc0NiA5MC4yNTUgMjYuMTE3OCA5MC4yNTUgMjguMzg2N0M5MC4yNTUgMzAuNjU1NyA4OC41OTc5IDMyLjE5ODkgODYuNjgwMSAzMi4xOTg5Wk03Mi44MDEyIDIyLjEwNTRDNjkuMjkzNyAyMi4xMDU0IDY2LjQ0MjIgMjQuNzQ5NyA2Ni40NDIyIDI4LjM4NjdDNjYuNDQyMiAzMi4wMjM3IDY5LjMwMjEgMzQuNjY4IDcyLjgwMTIgMzQuNjY4Qzc2LjMwMDQgMzQuNjY4IDc5LjE2MDMgMzEuOTk4NyA3OS4xNjAzIDI4LjM4NjdDNzkuMTYwMyAyNC43NzQ4IDc2LjMwMDQgMjIuMTA1NCA3Mi44MDEyIDIyLjEwNTRaTTcyLjgwMTIgMzIuMTk4OUM3MC44ODM0IDMyLjE5ODkgNjkuMjI2NCAzMC42MzA2IDY5LjIyNjQgMjguMzg2N0M2OS4yMjY0IDI2LjE0MjggNzAuODgzNCAyNC41NzQ2IDcyLjgwMTIgMjQuNTc0NkM3NC43MTkxIDI0LjU3NDYgNzYuMzc2MSAyNi4xMTc4IDc2LjM3NjEgMjguMzg2N0M3Ni4zNzYxIDMwLjY1NTcgNzQuNzE5MSAzMi4xOTg5IDcyLjgwMTIgMzIuMTk4OVpNNTYuMjg5NiAyNC4wMzIzVjI2LjcwMTdINjIuNzI0M0M2Mi41MzA5IDI4LjIwMzIgNjIuMDI2MiAyOS4yOTYgNjEuMjYwNyAzMC4wNjM0QzYwLjMyNzEgMzAuOTg5MyA1OC44NjM1IDMyLjAxNTQgNTYuMjg5NiAzMi4wMTU0QzUyLjMyNzggMzIuMDE1NCA0OS4yMzI0IDI4Ljg0NTUgNDkuMjMyNCAyNC45MTY2QzQ5LjIzMjQgMjAuOTg3NiA1Mi4zMjc4IDE3LjgxNzggNTYuMjg5NiAxNy44MTc4QzU4LjQyNjEgMTcuODE3OCA1OS45OTA2IDE4LjY1MiA2MS4xMzQ2IDE5LjcxOTdMNjMuMDM1NSAxNy44MzQ1QzYxLjQyOSAxNi4zMDc5IDU5LjI5MjUgMTUuMTQ4NCA1Ni4yODk2IDE1LjE0ODRDNTAuODY0MiAxNS4xNDg0IDQ2LjMwNTIgMTkuNTI3OCA0Ni4zMDUyIDI0LjkwODJDNDYuMzA1MiAzMC4yODg2IDUwLjg2NDIgMzQuNjY4IDU2LjI4OTYgMzQuNjY4QzU5LjIxNjggMzQuNjY4IDYxLjQyOSAzMy43MTcxIDYzLjE1MzMgMzEuOTMxOUM2NC45MjgxIDMwLjE3MTggNjUuNDgzMyAyNy42OTQ0IDY1LjQ4MzMgMjUuNjkyM0M2NS40ODMzIDI1LjA3NTEgNjUuNDMyOCAyNC40OTk1IDY1LjM0MDMgMjQuMDI0SDU2LjI4OTZWMjQuMDMyM1pNMTIzLjgwOCAyNi4xMDExQzEyMy4yNzggMjQuNjk5NyAxMjEuNjcyIDIyLjA5NzEgMTE4LjM4MyAyMi4wOTcxQzExNS4wOTQgMjIuMDk3MSAxMTIuNDAyIDI0LjY0MTMgMTEyLjQwMiAyOC4zNzg0QzExMi40MDIgMzEuODk4NiAxMTUuMDk0IDM0LjY1OTcgMTE4LjY5NCAzNC42NTk3QzEyMS41OTYgMzQuNjU5NyAxMjMuMjc4IDMyLjg5OTYgMTIzLjk3NyAzMS44NzM2TDEyMS44MTUgMzAuNDQ3MUMxMjEuMDkxIDMxLjQ5ODIgMTIwLjEwNyAzMi4xODIyIDExOC42OTQgMzIuMTgyMkMxMTcuMjgxIDMyLjE4MjIgMTE2LjI3MiAzMS41Mzk5IDExNS42MjQgMzAuMjgwM0wxMjQuMTAzIDI2LjgwMThMMTIzLjgxNyAyNi4wODQ0TDEyMy44MDggMjYuMTAxMVpNMTE1LjE2MSAyOC4xOTQ5QzExNS4wODYgMjUuNzY3NCAxMTcuMDYyIDI0LjUyNDUgMTE4LjQ3NSAyNC41MjQ1QzExOS41NzcgMjQuNTI0NSAxMjAuNTE5IDI1LjA3NTEgMTIwLjgzMSAyNS44NTkyTDExNS4xNjEgMjguMTk0OVpNMTA4LjI3MiAzNC4yOTI2SDExMS4wNTdWMTUuODE1OEgxMDguMjcyVjM0LjI5MjZaTTEwMy43MTMgMjMuNTA2OEgxMDMuNjIxQzEwMi45OTggMjIuNzcyOCAxMDEuNzk2IDIyLjEwNTQgMTAwLjI4MSAyMi4xMDU0Qzk3LjExMDMgMjIuMTA1NCA5NC4yMDg0IDI0Ljg2NjUgOTQuMjA4NCAyOC40MTE3Qzk0LjIwODQgMzEuOTU3IDk3LjExMDMgMzQuNjc2NCAxMDAuMjgxIDM0LjY3NjRDMTAxLjc5NiAzNC42NzY0IDEwMi45OSAzNC4wMDkgMTAzLjYyMSAzMy4yNDk5SDEwMy43MTNWMzQuMTUwOEMxMDMuNzEzIDM2LjU1MzIgMTAyLjQxOCAzNy44Mzc5IDEwMC4zMjQgMzcuODM3OUM5OC42MTYgMzcuODM3OSA5Ny41NjQ2IDM2LjYyIDk3LjEyNzIgMzUuNjAyM0w5NC43MDQ3IDM2LjYwMzNDOTUuNDAyOCAzOC4yNzE2IDk3LjI1MzMgNDAuMzE1NCAxMDAuMzI0IDQwLjMxNTRDMTAzLjU4NyA0MC4zMTU0IDEwNi4zNDYgMzguNDEzNCAxMDYuMzQ2IDMzLjc2NzFWMjIuNDgwOEgxMDMuNzA1VjIzLjUwNjhIMTAzLjcxM1pNMTAwLjUxNyAzMi4xOTg5Qzk4LjU5OTIgMzIuMTk4OSA5Ni45ODQyIDMwLjYwNTYgOTYuOTg0MiAyOC40MTE3Qzk2Ljk4NDIgMjYuMjE3OSA5OC41OTA3IDI0LjU3NDYgMTAwLjUxNyAyNC41NzQ2QzEwMi40NDMgMjQuNTc0NiAxMDMuOTA3IDI2LjE5MjggMTAzLjkwNyAyOC40MTE3QzEwMy45MDcgMzAuNjMwNiAxMDIuNDE4IDMyLjE5ODkgMTAwLjUxNyAzMi4xOTg5Wk0xMzYuODU0IDE1LjgxNThIMTMwLjE5M1YzNC4yOTI2SDEzMi45NzdWMjcuMjk0SDEzNi44NjNDMTM5Ljk0MSAyNy4yOTQgMTQyLjk3OCAyNS4wODM0IDE0Mi45NzggMjEuNTU0OUMxNDIuOTc4IDE4LjAyNjMgMTM5Ljk1IDE1LjgxNTggMTM2Ljg2MyAxNS44MTU4SDEzNi44NTRaTTEzNi45MjIgMjQuNzI0N0gxMzIuOTY4VjE4LjM5MzRIMTM2LjkyMkMxMzguOTk5IDE4LjM5MzQgMTQwLjE3NyAyMC4xMDM0IDE0MC4xNzcgMjEuNTYzMkMxNDAuMTc3IDIzLjAyMyAxMzguOTk5IDI0LjczMzEgMTM2LjkyMiAyNC43MzMxVjI0LjcyNDdaTTE1NC4xMDYgMjIuMDcyQzE1Mi4wOTYgMjIuMDcyIDE1MC4wMSAyMi45NDc5IDE0OS4xNDQgMjQuODk5OUwxNTEuNjE3IDI1LjkyNTlDMTUyLjE0NiAyNC44OTk5IDE1My4xMjIgMjQuNTc0NiAxNTQuMTU3IDI0LjU3NDZDMTU1LjU5NSAyNC41NzQ2IDE1Ny4wNTkgMjUuNDMzOCAxNTcuMDg0IDI2Ljk1MTlWMjcuMTQzOEMxNTYuNTc5IDI2Ljg2MDIgMTU1LjUwMyAyNi40MjY0IDE1NC4xODIgMjYuNDI2NEMxNTEuNTI0IDI2LjQyNjQgMTQ4LjgxNiAyNy44Nzc5IDE0OC44MTYgMzAuNTg4OUMxNDguODE2IDMzLjA1ODEgMTUwLjk5NCAzNC42NTEzIDE1My40NDIgMzQuNjUxM0MxNTUuMzA5IDM0LjY1MTMgMTU2LjM0NCAzMy44MTcyIDE1Ni45OTEgMzIuODQ5NUgxNTcuMDg0VjM0LjI3NkgxNTkuNzY3VjI3LjE5MzlDMTU5Ljc2NyAyMy45MTU2IDE1Ny4yOTQgMjIuMDgwNCAxNTQuMTA2IDIyLjA4MDRWMjIuMDcyWk0xNTMuNzc4IDMyLjE5MDVDMTUyLjg3IDMyLjE5MDUgMTUxLjYgMzEuNzQwMSAxNTEuNiAzMC42MjIzQzE1MS42IDI5LjE5NTkgMTUzLjE4MSAyOC42NDUzIDE1NC41NDQgMjguNjQ1M0MxNTUuNzYzIDI4LjY0NTMgMTU2LjM0NCAyOC45MDM5IDE1Ny4wODQgMjkuMjYyNkMxNTYuODY1IDMwLjk3MjYgMTU1LjM4NSAzMi4xODIyIDE1My43NzggMzIuMTgyMlYzMi4xOTA1Wk0xNjkuNTQxIDIyLjQ3MjVMMTY2LjM1MyAzMC40ODA1SDE2Ni4yNjFMMTYyLjk1NSAyMi40NzI1SDE1OS45NjFMMTY0LjkyMyAzMy42NjdMMTYyLjA5NyAzOS44OTgzSDE2NC45OTlMMTcyLjY0NSAyMi40NzI1SDE2OS41NUgxNjkuNTQxWk0xNDQuNSAzNC4yOTI2SDE0Ny4yODVWMTUuODE1OEgxNDQuNVYzNC4yOTI2WiIgZmlsbD0id2hpdGUiPjwvcGF0aD48cGF0aCBkPSJNMTYuMDE1NCAxOC4yNTk5TDAuMTUxMzY3IDM0Ljk2QzAuMTUxMzY3IDM0Ljk2IDAuMTUxMzY3IDM0Ljk2IDAuMTUxMzY3IDM0Ljk2ODRDMC42MzkyMzEgMzYuNzc4NSAyLjMwNDcgMzguMTEzMiA0LjI4OTggMzguMTEzMkM1LjA4MDQ4IDM4LjExMzIgNS44MjkxIDM3Ljg5NjMgNi40NTk5NSAzNy41MjkzTDYuNTEwNDIgMzcuNDk1OUwyNC4zNjc5IDI3LjI3NzNMMTYuMDA3IDE4LjI1MTZMMTYuMDE1NCAxOC4yNTk5WiIgZmlsbD0iI0VBNDMzNSI+PC9wYXRoPjxwYXRoIGQ9Ik0zMi4wNjQ3IDE1LjQxNTRIMzIuMDQ3OEwyNC4zMzQ1IDEwLjk2OTJMMTUuNjQ1NSAxOC42MzUzTDI0LjM1OTggMjcuMjc3M0wzMi4wMzEgMjIuODg5NUMzMy4zNzY4IDIyLjE3MjEgMzQuMjg1MyAyMC43NjI0IDM0LjI4NTMgMTkuMTQ0MUMzNC4yODUzIDE3LjUyNTggMzMuMzg1MyAxNi4xMzI4IDMyLjA1NjIgMTUuNDE1NEgzMi4wNjQ3WiIgZmlsbD0iI0ZCQkMwNCI+PC9wYXRoPjxwYXRoIGQ9Ik0wLjE0Mjk5NSAzLjI2OTlDMC4wNTA0Njg4IDMuNjIwMjUgMCAzLjk4NzI4IDAgNC4zNjI2NlYzMy44NzU2QzAgMzQuMjUxIDAuMDUwNDY4OCAzNC42MTggMC4xNDI5OTUgMzQuOTY4NEwxNi41NTM3IDE4LjY5MzdMMC4xNDI5OTUgMy4yNjk5WiIgZmlsbD0iIzQyODVGNCI+PC9wYXRoPjxwYXRoIGQ9Ik0xNi4xMzMxIDE5LjExMDdMMjQuMzQyNyAxMC45NjkyTDYuNTAyMDEgMC43MDg5MTlDNS44NTQzMyAwLjMyNTIwMSA1LjA5NzMgMC4wOTk5NzU2IDQuMjg5OCAwLjA5OTk3NTZDMi4zMDQ3IDAuMDk5OTc1NiAwLjYzOTIzMSAxLjQzNDY1IDAuMTUxMzY3IDMuMjUzMTRMMTYuMTMzMSAxOS4xMDI0VjE5LjExMDdaIiBmaWxsPSIjMzRBODUzIj48L3BhdGg+PC9zdmc+IAogICAgCiAgCiAgICAgICAgPC9zcGFuPgogIDwvYT4KCiAgICAgIDwvZGl2PgoKICAgICAgICA8L2Rpdj4KICAgICAgCiAgICAgICAgICAgICAgPGRpdiBjbGFzcz0iYWxvLWJsb2ctYmFubmVyX19yYXRpbmcgc29jaWFsLXByb29mLWl0ZW0gcmF0aW5nIj4KICAgICAgICAgIDxkaXYgY2xhc3M9Imljb24td3JhcHBlciI+CiAgICAgICAgICAgICAgICAgICAgICAgICAgPGRpdiBjbGFzcz0iaWNvbiI+CiAgICAgICAgICAgICAgICAKCgoKCgogICAgICAgICAgICAgICAgICAgICAgCiAgCiAgCgogICAgICAgICAgICAgPHN2ZyB4bWxucz0iaHR0cDovL3d3dy53My5vcmcvMjAwMC9zdmciIHdpZHRoPSIxMzYiIGhlaWdodD0iMjQiIHZpZXdCb3g9IjAgMCAxMzYgMjQiIGZpbGw9Im5vbmUiPjxwYXRoIGQ9Ik0xMi4zNTAxIDE3LjkzNEMxMi4xMzE0IDE3LjgxODggMTEuODcwMSAxNy44MTg3IDExLjY1MTQgMTcuOTMzN0w3LjE3Mzk4IDIwLjI4NzdDNi42MjM3NiAyMC41NzcgNS45ODA2NiAyMC4xMDk4IDYuMDg1NzYgMTkuNDk3MUw2Ljk0MTA5IDE0LjUxMDlDNi45ODI4NiAxNC4yNjc0IDYuOTAyMDQgMTQuMDE5IDYuNzI1MDIgMTMuODQ2N0wzLjA5ODIzIDEwLjMxNjRDMi42NTI1MyA5Ljg4MjUyIDIuODk4MjMgOS4xMjU5MSAzLjUxMzggOS4wMzY2OUw4LjUxNzQxIDguMzExNTNDOC43NjE4MSA4LjI3NjExIDguOTczMSA4LjEyMjY2IDkuMDgyMzkgNy45MDEyMUwxMS4zMjEzIDMuMzY0NzFDMTEuNTk2NCAyLjgwNzI3IDEyLjM5MTMgMi44MDcyNyAxMi42NjY0IDMuMzY0NzFMMTQuOTA1MiA3LjkwMTIxQzE1LjAxNDUgOC4xMjI2NiAxNS4yMjU4IDguMjc2MTEgMTUuNDcwMiA4LjMxMTUzTDIwLjQ3MzggOS4wMzY3QzIxLjA4OTQgOS4xMjU5MSAyMS4zMzUxIDkuODgyNTIgMjAuODg5NCAxMC4zMTY0TDE3LjI2MjYgMTMuODQ2N0MxNy4wODU2IDE0LjAxOSAxNy4wMDQ4IDE0LjI2NzQgMTcuMDQ2NSAxNC41MTA5TDE3LjkwMTYgMTkuNDk1M0MxOC4wMDY3IDIwLjEwODMgMTcuMzYzIDIwLjU3NTYgMTYuODEyNyAyMC4yODU2TDEyLjM1MDEgMTcuOTM0WiIgc3Ryb2tlPSIjMjI1MEU2IiBzdHJva2Utd2lkdGg9IjIuMjUiIHN0cm9rZS1saW5lY2FwPSJyb3VuZCIgc3Ryb2tlLWxpbmVqb2luPSJyb3VuZCI+PC9wYXRoPjxwYXRoIGQ9Ik0xMiAxOEw3LjUgMjAuMjVINi43NVYxNC4yNUwzLjc1IDkuNzVMOSA3LjVMMTIgM0wxNC4yNSA2TDE1LjQxMTYgOC4wMzk5NEwyMSA5Ljc1TDE2LjUgMTQuMjVMMTcuNSAyMC4yNUwxNC4yNSAxOC43NUwxMiAxOFoiIGZpbGw9IiMyMjUwRTYiPjwvcGF0aD48cGF0aCBkPSJNNDAuMzUwMSAxNy45MzRDNDAuMTMxNCAxNy44MTg4IDM5Ljg3MDEgMTcuODE4NyAzOS42NTE0IDE3LjkzMzdMMzUuMTc0IDIwLjI4NzdDMzQuNjIzOCAyMC41NzcgMzMuOTgwNyAyMC4xMDk4IDM0LjA4NTggMTkuNDk3MUwzNC45NDExIDE0LjUxMDlDMzQuOTgyOSAxNC4yNjc0IDM0LjkwMiAxNC4wMTkgMzQuNzI1IDEzLjg0NjdMMzEuMDk4MiAxMC4zMTY0QzMwLjY1MjUgOS44ODI1MiAzMC44OTgyIDkuMTI1OTEgMzEuNTEzOCA5LjAzNjY5TDM2LjUxNzQgOC4zMTE1M0MzNi43NjE4IDguMjc2MTEgMzYuOTczMSA4LjEyMjY2IDM3LjA4MjQgNy45MDEyMUwzOS4zMjEzIDMuMzY0NzFDMzkuNTk2NCAyLjgwNzI3IDQwLjM5MTMgMi44MDcyNyA0MC42NjY0IDMuMzY0NzFMNDIuOTA1MiA3LjkwMTIxQzQzLjAxNDUgOC4xMjI2NiA0My4yMjU4IDguMjc2MTEgNDMuNDcwMiA4LjMxMTUzTDQ4LjQ3MzggOS4wMzY3QzQ5LjA4OTQgOS4xMjU5MSA0OS4zMzUxIDkuODgyNTIgNDguODg5NCAxMC4zMTY0TDQ1LjI2MjYgMTMuODQ2N0M0NS4wODU2IDE0LjAxOSA0NS4wMDQ4IDE0LjI2NzQgNDUuMDQ2NSAxNC41MTA5TDQ1LjkwMTYgMTkuNDk1M0M0Ni4wMDY3IDIwLjEwODMgNDUuMzYzIDIwLjU3NTYgNDQuODEyNyAyMC4yODU2TDQwLjM1MDEgMTcuOTM0WiIgc3Ryb2tlPSIjMjI1MEU2IiBzdHJva2Utd2lkdGg9IjIuMjUiIHN0cm9rZS1saW5lY2FwPSJyb3VuZCIgc3Ryb2tlLWxpbmVqb2luPSJyb3VuZCI+PC9wYXRoPjxwYXRoIGQ9Ik00MCAxOEwzNS41IDIwLjI1SDM0Ljc1VjE0LjI1TDMxLjc1IDkuNzVMMzcgNy41TDQwIDNMNDIuMjUgNkw0My40MTE2IDguMDM5OTRMNDkgOS43NUw0NC41IDE0LjI1TDQ1LjUgMjAuMjVMNDIuMjUgMTguNzVMNDAgMThaIiBmaWxsPSIjMjI1MEU2Ij48L3BhdGg+PHBhdGggZD0iTTY4LjM1MDEgMTcuOTM0QzY4LjEzMTQgMTcuODE4OCA2Ny44NzAxIDE3LjgxODcgNjcuNjUxNCAxNy45MzM3TDYzLjE3NCAyMC4yODc3QzYyLjYyMzggMjAuNTc3IDYxLjk4MDcgMjAuMTA5OCA2Mi4wODU4IDE5LjQ5NzFMNjIuOTQxMSAxNC41MTA5QzYyLjk4MjkgMTQuMjY3NCA2Mi45MDIgMTQuMDE5IDYyLjcyNSAxMy44NDY3TDU5LjA5ODIgMTAuMzE2NEM1OC42NTI1IDkuODgyNTIgNTguODk4MiA5LjEyNTkxIDU5LjUxMzggOS4wMzY2OUw2NC41MTc0IDguMzExNTNDNjQuNzYxOCA4LjI3NjExIDY0Ljk3MzEgOC4xMjI2NiA2NS4wODI0IDcuOTAxMjFMNjcuMzIxMyAzLjM2NDcxQzY3LjU5NjQgMi44MDcyNyA2OC4zOTEzIDIuODA3MjcgNjguNjY2NCAzLjM2NDcxTDcwLjkwNTIgNy45MDEyMUM3MS4wMTQ1IDguMTIyNjYgNzEuMjI1OCA4LjI3NjExIDcxLjQ3MDIgOC4zMTE1M0w3Ni40NzM4IDkuMDM2N0M3Ny4wODk0IDkuMTI1OTEgNzcuMzM1MSA5Ljg4MjUyIDc2Ljg4OTQgMTAuMzE2NEw3My4yNjI2IDEzLjg0NjdDNzMuMDg1NiAxNC4wMTkgNzMuMDA0OCAxNC4yNjc0IDczLjA0NjUgMTQuNTEwOUw3My45MDE2IDE5LjQ5NTNDNzQuMDA2NyAyMC4xMDgzIDczLjM2MyAyMC41NzU2IDcyLjgxMjcgMjAuMjg1Nkw2OC4zNTAxIDE3LjkzNFoiIHN0cm9rZT0iIzIyNTBFNiIgc3Ryb2tlLXdpZHRoPSIyLjI1IiBzdHJva2UtbGluZWNhcD0icm91bmQiIHN0cm9rZS1saW5lam9pbj0icm91bmQiPjwvcGF0aD48cGF0aCBkPSJNNjggMThMNjMuNSAyMC4yNUg2Mi43NVYxNC4yNUw1OS43NSA5Ljc1TDY1IDcuNUw2OCAzTDcwLjI1IDZMNzEuNDExNiA4LjAzOTk0TDc3IDkuNzVMNzIuNSAxNC4yNUw3My41IDIwLjI1TDcwLjI1IDE4Ljc1TDY4IDE4WiIgZmlsbD0iIzIyNTBFNiI+PC9wYXRoPjxwYXRoIGQ9Ik05Ni4zNTAxIDE3LjkzNEM5Ni4xMzE0IDE3LjgxODggOTUuODcwMSAxNy44MTg3IDk1LjY1MTQgMTcuOTMzN0w5MS4xNzQgMjAuMjg3N0M5MC42MjM4IDIwLjU3NyA4OS45ODA3IDIwLjEwOTggOTAuMDg1OCAxOS40OTcxTDkwLjk0MTEgMTQuNTEwOUM5MC45ODI5IDE0LjI2NzQgOTAuOTAyIDE0LjAxOSA5MC43MjUgMTMuODQ2N0w4Ny4wOTgyIDEwLjMxNjRDODYuNjUyNSA5Ljg4MjUyIDg2Ljg5ODIgOS4xMjU5MSA4Ny41MTM4IDkuMDM2NjlMOTIuNTE3NCA4LjMxMTUzQzkyLjc2MTggOC4yNzYxMSA5Mi45NzMxIDguMTIyNjYgOTMuMDgyNCA3LjkwMTIxTDk1LjMyMTMgMy4zNjQ3MUM5NS41OTY0IDIuODA3MjcgOTYuMzkxMyAyLjgwNzI3IDk2LjY2NjQgMy4zNjQ3MUw5OC45MDUyIDcuOTAxMjFDOTkuMDE0NSA4LjEyMjY2IDk5LjIyNTggOC4yNzYxMSA5OS40NzAyIDguMzExNTNMMTA0LjQ3NCA5LjAzNjdDMTA1LjA4OSA5LjEyNTkxIDEwNS4zMzUgOS44ODI1MiAxMDQuODg5IDEwLjMxNjRMMTAxLjI2MyAxMy44NDY3QzEwMS4wODYgMTQuMDE5IDEwMS4wMDUgMTQuMjY3NCAxMDEuMDQ3IDE0LjUxMDlMMTAxLjkwMiAxOS40OTUzQzEwMi4wMDcgMjAuMTA4MyAxMDEuMzYzIDIwLjU3NTYgMTAwLjgxMyAyMC4yODU2TDk2LjM1MDEgMTcuOTM0WiIgc3Ryb2tlPSIjMjI1MEU2IiBzdHJva2Utd2lkdGg9IjIuMjUiIHN0cm9rZS1saW5lY2FwPSJyb3VuZCIgc3Ryb2tlLWxpbmVqb2luPSJyb3VuZCI+PC9wYXRoPjxwYXRoIGQ9Ik05NiAxOEw5MS41IDIwLjI1SDkwLjc1VjE0LjI1TDg3Ljc1IDkuNzVMOTMgNy41TDk2IDNMOTguMjUgNkw5OS40MTE2IDguMDM5OTRMMTA1IDkuNzVMMTAwLjUgMTQuMjVMMTAxLjUgMjAuMjVMOTguMjUgMTguNzVMOTYgMThaIiBmaWxsPSIjMjI1MEU2Ij48L3BhdGg+PHBhdGggZD0iTTEyNC4zNSAxNy45MzRDMTI0LjEzMSAxNy44MTg4IDEyMy44NyAxNy44MTg3IDEyMy42NTEgMTcuOTMzN0wxMTkuMTc0IDIwLjI4NzdDMTE4LjYyNCAyMC41NzcgMTE3Ljk4MSAyMC4xMDk4IDExOC4wODYgMTkuNDk3MUwxMTguOTQxIDE0LjUxMDlDMTE4Ljk4MyAxNC4yNjc0IDExOC45MDIgMTQuMDE5IDExOC43MjUgMTMuODQ2N0wxMTUuMDk4IDEwLjMxNjRDMTE0LjY1MyA5Ljg4MjUyIDExNC44OTggOS4xMjU5MSAxMTUuNTE0IDkuMDM2NjlMMTIwLjUxNyA4LjMxMTUzQzEyMC43NjIgOC4yNzYxMSAxMjAuOTczIDguMTIyNjYgMTIxLjA4MiA3LjkwMTIxTDEyMy4zMjEgMy4zNjQ3MUMxMjMuNTk2IDIuODA3MjcgMTI0LjM5MSAyLjgwNzI3IDEyNC42NjYgMy4zNjQ3MUwxMjYuOTA1IDcuOTAxMjFDMTI3LjAxNSA4LjEyMjY2IDEyNy4yMjYgOC4yNzYxMSAxMjcuNDcgOC4zMTE1M0wxMzIuNDc0IDkuMDM2N0MxMzMuMDg5IDkuMTI1OTEgMTMzLjMzNSA5Ljg4MjUyIDEzMi44ODkgMTAuMzE2NEwxMjkuMjYzIDEzLjg0NjdDMTI5LjA4NiAxNC4wMTkgMTI5LjAwNSAxNC4yNjc0IDEyOS4wNDcgMTQuNTEwOUwxMjkuOTAyIDE5LjQ5NTNDMTMwLjAwNyAyMC4xMDgzIDEyOS4zNjMgMjAuNTc1NiAxMjguODEzIDIwLjI4NTZMMTI0LjM1IDE3LjkzNFoiIHN0cm9rZT0iIzIyNTBFNiIgc3Ryb2tlLXdpZHRoPSIyLjI1IiBzdHJva2UtbGluZWNhcD0icm91bmQiIHN0cm9rZS1saW5lam9pbj0icm91bmQiPjwvcGF0aD48cGF0aCBkPSJNMTI0IDE4TDExOS41IDIwLjI1SDExOC43NVYxNC4yNUwxMTUuNzUgOS43NUwxMjEgNy41TDEyNCAzTDEyNi4yNSA2TDEyNyA4LjVWMTguNzVIMTI2LjI1TDEyNCAxOFoiIGZpbGw9IiMyMjUwRTYiPjwvcGF0aD48L3N2Zz4gCiAgICAKICAKICAgICAgICAgICAgICA8L2Rpdj4KICAgICAgICAgICAgICAgICAgICAgIDwvZGl2PgoKICAgICAgICAgICAgICAgICAgICAgIDxkaXYgY2xhc3M9InRleHQiPjxwPjxzcGFuIGNsYXNzPSJzay10ZXh0LS14LWV4dHJhLXNtYWxsLTIiPjxzdHJvbmc+NC42IGF2ZXJhZ2UgcmF0aW5nPC9zdHJvbmc+ICgyOCw1MzErIHJldmlld3MpPC9zcGFuPjwvcD4KPC9kaXY+CiAgICAgICAgICAgICAgICAgIDwvZGl2PgogICAgICAgICAgPC9kaXY+CgogICAgICAgICAgPGRpdiBjbGFzcz0iYWxvLWJsb2ctYmFubmVyX19iZyI+CiAgICAgICAgCgoKCgoKICAgICAgICAgICAgICAgICAgICAgICAgICAgICAgICAgICAgICAgICAgICAgICAgICAgICAgICAgICAgICAgICAgICAgICAgICAgICAgICAgIAogIAogICAgICAgICAgICAgICAgICAgICAgICAgICAgICAgIAoKICAKICAgIDxwaWN0dXJlPgogICAgICAgICAgICAgICAgICAgICAgICAgICAgICAgICAgICAgICAgCiAgICAgICAgPHNvdXJjZSB0eXBlPSJpbWFnZS93ZWJwIgogICAgICAgICAgICAgICAgc2l6ZXM9IihtYXgtd2lkdGg6IDUxMnB4KSA2MDBweCwgMTAwMHB4IgogICAgICAgICAgICAgICAgc3Jjc2V0PSJodHRwczovL2Fsb3NpbS5jb20vd3AtY29udGVudC91cGxvYWRzLzIwMjYvMDcvNmE0ZDFjZTY3MzNhOS1iY2s0LTEwMHgwLWMtZGVmYXVsdC53ZWJwIDEwMHcsIGh0dHBzOi8vYWxvc2ltLmNvbS93cC1jb250ZW50L3VwbG9hZHMvMjAyNi8wNy82YTRkMWNlNjczM2E5LWJjazQtMjAweDAtYy1kZWZhdWx0LndlYnAgMjAwdywgaHR0cHM6Ly9hbG9zaW0uY29tL3dwLWNvbnRlbnQvdXBsb2Fkcy8yMDI2LzA3LzZhNGQxY2U2NzMzYTktYmNrNC00MDB4MC1jLWRlZmF1bHQud2VicCA0MDB3LCBodHRwczovL2Fsb3NpbS5jb20vd3AtY29udGVudC91cGxvYWRzLzIwMjYvMDcvNmE0ZDFjZTY3MzNhOS1iY2s0LTYwMHgwLWMtZGVmYXVsdC53ZWJwIDYwMHcsIGh0dHBzOi8vYWxvc2ltLmNvbS93cC1jb250ZW50L3VwbG9hZHMvMjAyNi8wNy82YTRkMWNlNjczM2E5LWJjazQtODAweDAtYy1kZWZhdWx0LndlYnAgODAwdywgaHR0cHM6Ly9hbG9zaW0uY29tL3dwLWNvbnRlbnQvdXBsb2Fkcy8yMDI2LzA3LzZhNGQxY2U2NzMzYTktYmNrNC0xMjAweDAtYy1kZWZhdWx0LndlYnAgMTIwMHcsIGh0dHBzOi8vYWxvc2ltLmNvbS93cC1jb250ZW50L3VwbG9hZHMvMjAyNi8wNy82YTRkMWNlNjczM2E5LWJjazQtMjQwMHgwLWMtZGVmYXVsdC53ZWJwIDI0MDB3LCBodHRwczovL2Fsb3NpbS5jb20vd3AtY29udGVudC91cGxvYWRzLzIwMjYvMDcvNmE0ZDFjZTY3MzNhOS1iY2s0LndlYnAgMjc1NHciCiAgICAgICAgICBtZWRpYT0iKG1pbi13aWR0aDogNjUwcHgpIgogICAgICAgID4KICAgICAgCiAgICAgIAogICAgICAgICAgICAgIDxzb3VyY2UgdHlwZT0iaW1hZ2Uvd2VicCIKICAgICAgICAgICAgICAgIHNpemVzPSIiCiAgICAgICAgICAgICAgICBzcmNzZXQ9Imh0dHBzOi8vYWxvc2ltLmNvbS93cC1jb250ZW50L3VwbG9hZHMvMjAyNi8wNy82YTRkMTE0YjM1NjkwLTZhNDdiYTFhYTA2YjMtYmNrMS1lMTc4MzA4NTY1MjkwMS00MDB4MC1jLWRlZmF1bHQud2VicCA0MDB3LCBodHRwczovL2Fsb3NpbS5jb20vd3AtY29udGVudC91cGxvYWRzLzIwMjYvMDcvNmE0ZDExNGIzNTY5MC02YTQ3YmExYWEwNmIzLWJjazEtZTE3ODMwODU2NTI5MDEtNjAweDAtYy1kZWZhdWx0LndlYnAgNjAwdywgaHR0cHM6Ly9hbG9zaW0uY29tL3dwLWNvbnRlbnQvdXBsb2Fkcy8yMDI2LzA3LzZhNGQxMTRiMzU2OTAtNmE0N2JhMWFhMDZiMy1iY2sxLWUxNzgzMDg1NjUyOTAxLndlYnAgNjQwdyIKICAgICAgICA+CiAgICAgIAogICAgICAKICAgICAgPGltZyBjbGFzcz0iIgogICAgICAgICAgIHdpZHRoPSIyNzU0IgogICAgICAgICAgIGhlaWdodD0iMTI4MCIKICAgICAgICAgICBhbHQ9IjZhNGQxY2U2NzMzYTktYmNrKDQpIgogICAgICAgICAgIHNyYz0iaHR0cHM6Ly9hbG9zaW0uY29tL3dwLWNvbnRlbnQvdXBsb2Fkcy8yMDI2LzA3LzZhNGQxY2U2NzMzYTktYmNrNC5wbmciCiAgICAgICAgbG9hZGluZz0ibGF6eSIKICAgICAgPgogICAgPC9waWN0dXJlPgogIAogICAgICA8L2Rpdj4KICAgICAgPC9kaXY+CjwvZGl2Pgo=","PGRpdiBjbGFzcz0iYWxvLWJsb2ctYmFubmVyIGFsby1ibG9nLWJhbm5lci0tdHlwZTIgZ3V0ZW5iZXJnLWJsb2NrIiBkYXRhLWJhbm5lci1pZD0iODEzMzkiPgogIDxkaXYgY2xhc3M9ImFsby1ibG9nLWJhbm5lcl9fd3JhcHBlciI+CiAgICA8ZGl2IGNsYXNzPSJhbG8tYmxvZy1iYW5uZXJfX2NvbnRlbnQiPgogICAgICAgICAgICAgIDxkaXYgY2xhc3M9ImFsby1ibG9nLWJhbm5lcl9fbG9nbyI+CiAgICAgICAgICAKCgoKCgogICAgICAgICAgICAgICAgICAgICAgCiAgCiAgCgogICAgICAgICAgICAgPHN2ZyB4bWxucz0iaHR0cDovL3d3dy53My5vcmcvMjAwMC9zdmciIHdpZHRoPSIxMTIiIGhlaWdodD0iNDAiIHZpZXdCb3g9IjAgMCAxMTIgNDAiIGZpbGw9Im5vbmUiPjxnIGNsaXAtcGF0aD0idXJsKCNjbGlwMF8zMDE2XzQ1OTkpIj48cGF0aCBkPSJNMjguOTM0NCAwSDIyLjUxNDZWMjQuMTcxNkgyOC45MzQ0VjBaIiBmaWxsPSIjMTUzMEJCIj48L3BhdGg+PHBhdGggZD0iTTQzLjU1MTUgMTcuOTk5QzQ0LjM4ODEgMTcuMTcxIDQ0LjgwNzkgMTUuOTI3NSA0NC44MDc5IDE0LjM2MTVDNDQuODA3OSAxMi43OTU0IDQ0LjM4OTYgMTEuNTk4NCA0My41OTg1IDEwLjc3MDRDNDIuODA3NCA5Ljg5NTg1IDQxLjgzMTQgOS40ODE4NCA0MC42Njc1IDkuNDgxODRDMzkuNTAzNiA5LjQ4MTg0IDM4LjUyNzYgOS44OTU4NSAzNy43MzY1IDEwLjcyNTRDMzYuOTQ1NCAxMS41NTM0IDM2LjU3NDEgMTIuNzk2OSAzNi41NzQxIDE0LjM2M0MzNi41NzQxIDE1LjkyOSAzNi45NDY5IDE3LjE3MSAzNy43MzY1IDE4LjAwMDVDMzguNDgwNiAxOC44Mjg2IDM5LjQ1ODEgMTkuMjQ0MSA0MC42MjA1IDE5LjI0NDFDNDEuNzgyOSAxOS4yNDQxIDQyLjc2MDQgMTguODMwMSA0My41NTE1IDE4LjAwMDVWMTcuOTk5Wk0zNS4zNjQ3IDIzLjIwMTJDMzMuODI5NCAyMi40MTgyIDMyLjYyMDEgMjEuMjIxMSAzMS43MzY1IDE5LjcwMTZDMzAuODUzIDE4LjE4MjEgMzAuMzg3NyAxNi40MzMgMzAuMzg3NyAxNC4zNjE1QzMwLjM4NzcgMTIuMjg5OSAzMC44NTMgMTAuNTg1OSAzMS43MzY1IDkuMDY2MzNDMzIuNjY3IDcuNTQ2NzkgMzMuODc2NCA2LjM0OTc2IDM1LjQ1NzEgNS41MjE3NEMzNi45OTIzIDQuNjkzNzIgMzguNzU5NCA0LjMyNDcxIDQwLjY2NzUgNC4zMjQ3MUM0Mi41NzU1IDQuMzI0NzEgNDQuMzg4MSA0LjY5MzcyIDQ1LjkyMzMgNS41MjE3NEM0Ny41MDU1IDYuMzQ5NzYgNDguNzE0OSA3LjU0ODI5IDQ5LjU5ODQgOS4wNjYzM0M1MC41MjkgMTAuNTg1OSA1MC45NDczIDEyLjM4MTQgNTAuOTQ3MyAxNC4zNjE1QzUwLjk0NzMgMTYuMzQxNSA1MC41MjkgMTguMTgzNiA0OS41OTg0IDE5LjcwMTZDNDguNjY3OSAyMS4yMjExIDQ3LjQ1ODUgMjIuNDE4MiA0NS44Nzc4IDIzLjIwMTJDNDQuMjk1NiAyNC4wMjkyIDQyLjUyODUgMjQuNDQ0NyA0MC42MjIgMjQuNDQ0N0MzOC43MTU1IDI0LjQ0NDcgMzYuOTQ2OSAyNC4wMzA3IDM1LjM2NjIgMjMuMjAxMkgzNS4zNjQ3WiIgZmlsbD0iIzE1MzBCQiI+PC9wYXRoPjxwYXRoIGQ9Ik01NS44Nzg0IDIzLjU3MDJDNTQuNTI5NiAyMi45NzE3IDUzLjQ1OTYgMjIuMTg4NyA1Mi42Njg1IDIxLjE3NjFDNTEuODc3NCAyMC4xNjM2IDUxLjQ1OTEgMTkuMDExNiA1MS4zNjY3IDE3LjcyM0g1Ny4zNjY2QzU3LjQxMzYgMTguNDEzMSA1Ny43Mzk1IDE4Ljk2NjYgNTguMjk3MiAxOS4zODA2QzU4Ljg1NDkgMTkuNzk0NiA1OS41NTM1IDIwLjAyNTYgNjAuMzkwMSAyMC4wMjU2QzYxLjEzNDIgMjAuMDI1NiA2MS43Mzg5IDE5Ljg4NzYgNjIuMTU3MiAxOS41NjUxQzYyLjU3NTUgMTkuMjg5MSA2Mi43NjE5IDE4LjkyMDEgNjIuNzYxOSAxOC40NTk2QzYyLjc2MTkgMTcuOTA3NSA2Mi40ODMgMTcuNDkyIDYxLjg3ODQgMTcuMjE2QzYxLjI3MzcgMTYuOTQgNjAuMzQzMSAxNi42MTc1IDU4Ljk5NDMgMTYuMjk1QzU3LjU5ODUgMTUuOTcyNSA1Ni4zODkxIDE1LjY1IDU1LjQ1ODYgMTUuMjgyNUM1NC41MjgxIDE0LjkxMzUgNTMuNjkxNSAxNC4zMTUgNTMuMDM5OCAxMy41MzM0QzUyLjM0MjcgMTIuNzUwNCA1MS45Njk5IDExLjY5MTQgNTEuOTY5OSAxMC4zNTY0QzUxLjk2OTkgOS4yNTA4MyA1Mi4yOTU3IDguMjM4MyA1Mi45NDc0IDcuMzE3MjhDNTMuNTUyMSA2LjM5NjI2IDU0LjQ4MjYgNS42NTk3NCA1NS42OTIgNS4xMDc3M0M1Ni45MDE0IDQuNTU1NzEgNTguMzQ0MiA0LjMyNDcxIDYwLjAxNzMgNC4zMjQ3MUM2Mi41Mjg1IDQuMzI0NzEgNjQuNDgzNSA0LjkyMzIyIDY1LjkyNDggNi4xMjAyNUM2Ny4zMjA2IDcuMzYzNzggNjguMTU3MiA4Ljk3NDgyIDY4LjM5MDUgMTAuOTU0OUg2Mi43NjE5QzYyLjY2OTUgMTAuMzA5OSA2Mi4zODkxIDkuNzU3ODQgNjEuODc4NCA5LjM0MzgzQzYxLjM2NjEgOC45NzQ4MiA2MC42NjkgOC43NDUzMiA1OS44Nzc5IDguNzQ1MzJDNTkuMTMzNyA4Ljc0NTMyIDU4LjYyMTUgOC44ODMzMiA1OC4yNTAyIDkuMTU5MzNDNTcuODMxOSA5LjQzNTM0IDU3LjY0NTUgOS44MDQzNCA1Ny42NDU1IDEwLjI2NDlDNTcuNjQ1NSAxMC44MTY5IDU3Ljk3MTMgMTEuMjMyNCA1OC41NzYgMTEuNTUzNEM1OS4xODA3IDExLjgyOTQgNjAuMTExMyAxMi4xMDU0IDYxLjM2NzYgMTIuMzgxNEM2Mi44NTU5IDEyLjc1MDQgNjQuMDY1MiAxMy4xMTc5IDY0Ljk0ODggMTMuNDg2OUM2NS44NzkzIDEzLjg1NTkgNjYuNzE1OSAxNC40MDggNjcuNDE0NSAxNS4yMzZDNjguMTExNyAxNi4wNjQgNjguNDM3NSAxNy4xMjMgNjguNDg0NSAxOC40NTk2QzY4LjQ4NDUgMTkuNjEwMSA2OC4xNTg3IDIwLjY2OTEgNjcuNTA3IDIxLjU0MzZDNjYuODU1MyAyMi40NjQ3IDY1LjkyNDggMjMuMTU0NyA2NC43MTU0IDIzLjY2MTdDNjMuNTA2IDI0LjE2ODcgNjIuMDYzMiAyNC40NDQ3IDYwLjQ4MjYgMjQuNDQ0N0M1OC43NjA5IDI0LjQ0NDcgNTcuMjI1NyAyNC4xNjg3IDU1Ljg3NjkgMjMuNTcwMkg1NS44Nzg0WiIgZmlsbD0iIzE1MzBCQiI+PC9wYXRoPjxwYXRoIGQ9Ik03Ni4yMTA1IDQuNjA1NDdINzAuMTYzNlYyNC4xNzM1SDc2LjIxMDVWNC42MDU0N1oiIGZpbGw9IiMxNTMwQkIiPjwvcGF0aD48cGF0aCBkPSJNMTA5LjgxMiA2LjU4MjExQzExMS4zMDEgOC4wNTUxNSAxMTEuOTk5IDEwLjEyNjcgMTExLjk5OSAxMi43MDUzVjI0LjE3MDFIMTA1Ljk5OVYxMy41MzQ4QzEwNS45OTkgMTIuMjkxMyAxMDUuNjI3IDExLjI3ODcgMTA0Ljk3NiAxMC41ODg3QzEwNC4zMjUgOS44OTg3IDEwMy4zOTQgOS41NzYxOSAxMDIuMTg1IDkuNTc2MTlDMTAwLjk3NSA5LjU3NjE5IDEwMC4wOTIgOS44OTg3IDk5LjM5MzMgMTAuNTg4N0M5OC43NDE2IDExLjI3ODcgOTguNDE1OCAxMi4yOTI4IDk4LjQxNTggMTMuNTM0OFYyNC4xNzAxSDkyLjM2ODhWMTMuNTM0OEM5Mi4zNjg4IDEyLjI5MTMgOTIuMDQzIDExLjI3ODcgOTEuMzQ1OCAxMC41ODg3QzkwLjY5NDIgOS44OTg3IDg5Ljc2MzYgOS41NzYxOSA4OC41NTQzIDkuNTc2MTlDODcuMzQ0OSA5LjU3NjE5IDg2LjQ2MTMgOS44OTg3IDg1LjgwOTcgMTAuNTg4N0M4NS4xMTI1IDExLjI3ODcgODQuNzg2NyAxMi4yOTI4IDg0Ljc4NjcgMTMuNTM0OFYyNC4xNzAxSDc4LjczOTdWNC42MDIwNkg4NC43ODY3VjcuMDQyNjNDODUuMzkxNCA2LjIxNDYgODYuMTgyNSA1LjU2OTU5IDg3LjIwNTQgNS4xMDkwOEM4OC4xODMgNC42MDIwNiA4OS4yOTg0IDQuMzcyNTYgOTAuNTU0NyA0LjM3MjU2QzkyLjA0MyA0LjM3MjU2IDkzLjM5MTggNC42OTUwNyA5NC41NTU3IDUuMzQwMDhDOTUuNzE4MSA1LjkzODYgOTYuNjQ4NyA2Ljg1OTYyIDk3LjMwMDMgOC4wMTAxNUM5Ny45OTc1IDYuOTUxMTIgOTguOTI4IDYuMDc2NiAxMDAuMDkyIDUuMzg1MDhDMTAxLjMwMSA0LjY5NTA3IDEwMi41NTggNC4zNzI1NiAxMDMuOTUzIDQuMzcyNTZDMTA2LjQxOSA0LjM3MjU2IDEwOC4zNzMgNS4xMDkwOCAxMDkuODE0IDYuNTgyMTFIMTA5LjgxMloiIGZpbGw9IiMxNTMwQkIiPjwvcGF0aD48cGF0aCBkPSJNMTMuMTYzOCAxNy45OTlDMTQuMDAwNCAxNy4xNzEgMTQuNDIwMiAxNS45Mjc1IDE0LjQyMDIgMTQuMzYxNUMxNC40MjAyIDEyLjc5NTQgMTQuMDAxOSAxMS41OTg0IDEzLjIxMDggMTAuNzcwNEMxMi40MTk3IDkuODk1ODUgMTEuNDQzNyA5LjQ4MTg0IDEwLjI3OTggOS40ODE4NEM5LjExNTg2IDkuNDgxODQgOC4xMzk4NiA5Ljg5NTg1IDcuMzQ4NzYgMTAuNzI1NEM2LjU1NzY2IDExLjU1MzQgNi4xODYzNSAxMi43OTY5IDYuMTg2MzUgMTQuMzYzQzYuMTg2MzUgMTUuOTI5IDYuNTU5MTcgMTcuMTcxIDcuMzQ4NzYgMTguMDAwNUM4LjA5Mjg4IDE4LjgyODYgOS4wNzAzOSAxOS4yNDQxIDEwLjIzMjggMTkuMjQ0MUMxMS4zOTUyIDE5LjI0NDEgMTIuMzcyNyAxOC44MzAxIDEzLjE2MzggMTguMDAwNVYxNy45OTlaTTIwLjU1OTYgMjQuMTY4N0gxNC41MTI2VjIyLjYwMjdDMTMuNTgyMSAyMy42NjE3IDExLjc2OCAyNC4zOTgyIDkuOTA2OTYgMjQuNDQ0N0M4LjA0NTkgMjQuNDkxMiA2LjUxMDY4IDI0LjAzMDcgNC45NzU0NSAyMy4yMDEyQzMuNDQwMjMgMjIuNDE4MiAyLjIzMDg1IDIxLjIyMTEgMS4zNDczIDE5LjcwMTZDMC40NjUyNjUgMTguMTgzNiAwIDE2LjQzNDUgMCAxNC4zNjE1QzAgMTIuMjg4NCAwLjQ2NTI2NSAxMC41ODU5IDEuMzQ4ODEgOS4wNjYzM0MyLjIzMjM2IDcuNTQ2NzkgMy40ODg3MyA2LjM0OTc2IDUuMDIzOTUgNS41MjE3NEM2LjYwNjE1IDQuNjkzNzIgOC4zMjYyNyA0LjMyNDcxIDEwLjI3OTggNC4zMjQ3MUMxNi42NTI1IDQuMzI0NzEgMjAuNTU5NiA4LjYwNTgxIDIwLjU1OTYgMTUuMzc0VjI0LjE2NzJWMjQuMTY4N1oiIGZpbGw9IiMxNTMwQkIiPjwvcGF0aD48cGF0aCBkPSJNNDQuNzk2NCAzMi4xNjgxQzM5LjUzNzYgMzcuMzczMyAzMi42MDU2IDQwLjAwMTMgMjUuNzI1MSA0MC4wMDEzQzE4Ljg0NDcgNDAuMDAxMyAxMS45MTI3IDM3LjM3NDggNi42NTM4MSAzMi4xNjgxTDEwLjczMzYgMjguMDgyQzE0Ljg2MTkgMzIuMTY4MSAyMC4zMTkzIDM0LjIxMjcgMjUuNzI1MSAzNC4yMTI3QzMxLjEzMSAzNC4yMTI3IDM2LjUzODQgMzIuMTY5NiA0MC42NjgxIDI4LjA4Mkw0NC43OTY0IDMyLjE2ODFaIiBmaWxsPSIjNENEQTY0Ij48L3BhdGg+PHBhdGggZD0iTTUxLjkzNjQgMzEuMDcxN0M1Mi4yNDg2IDMwLjg5NDcgNTIuNjA0NyAzMC44MDYyIDUzLjAwNDggMzAuODA2MlYzMi4zNjkySDUyLjYwNzhDNTIuMTM0OSAzMi4zNjkyIDUxLjc3ODggMzIuNDc4NyA1MS41MzkzIDMyLjY5OTJDNTEuMjk5OSAzMi45MTk3IDUxLjE4MDIgMzMuMzAyMiA1MS4xODAyIDMzLjg0NjdWMzYuNzgwOEg0OS42NzY4VjMwLjg5MTdINTEuMTgwMlYzMS44MDY3QzUxLjM3NDEgMzEuNDk0NyA1MS42MjU3IDMxLjI1MDIgNTEuOTM3OSAzMS4wNzMyTDUxLjkzNjQgMzEuMDcxN1oiIGZpbGw9ImJsYWNrIj48L3BhdGg+PHBhdGggZD0iTTU1LjExMDcgMzYuNDk3MUM1NC42NTMgMzYuMjQ1MSA1NC4yOTIzIDM1Ljg4OTYgNTQuMDMxNyAzNS40MjkxQzUzLjc3MSAzNC45Njg2IDUzLjYzOTIgMzQuNDM3NSA1My42MzkyIDMzLjgzNDVDNTMuNjM5MiAzMy4yMzE1IDUzLjc3NCAzMi43MDA1IDU0LjA0MjMgMzIuMjRDNTQuMzEwNSAzMS43Nzk1IDU0LjY3NzMgMzEuNDIyNSA1NS4xNDI2IDMxLjE3MkM1NS42MDc4IDMwLjkxOTkgNTYuMTI3NiAzMC43OTM5IDU2LjcwMDUgMzAuNzkzOUM1Ny4yNzM0IDMwLjc5MzkgNTcuNzkxNyAzMC45MTk5IDU4LjI1ODUgMzEuMTcyQzU4LjcyMzcgMzEuNDI0IDU5LjA5MDUgMzEuNzc5NSA1OS4zNTg3IDMyLjI0QzU5LjYyNyAzMi43MDA1IDU5Ljc2MTkgMzMuMjMzIDU5Ljc2MTkgMzMuODM0NUM1OS43NjE5IDM0LjQzNiA1OS42MjM5IDM0Ljk2ODYgNTkuMzQ4MSAzNS40MjkxQzU5LjA3MjMgMzUuODg5NiA1OC42OTk1IDM2LjI0NjYgNTguMjMxMiAzNi40OTcxQzU3Ljc2MTQgMzYuNzQ5MSA1Ny4yMzcgMzYuODc1MSA1Ni42NTgxIDM2Ljg3NTFDNTYuMDc5MSAzNi44NzUxIDU1LjU2OTkgMzYuNzQ5MSA1NS4xMTA3IDM2LjQ5NzFaTTU3LjQyNDkgMzUuMzgxMUM1Ny42NjQ0IDM1LjI1MDYgNTcuODU2OSAzNS4wNTQxIDU3Ljk5OTMgMzQuNzkxNUM1OC4xNDE4IDM0LjUyOSA1OC4yMTQ1IDM0LjIxMSA1OC4yMTQ1IDMzLjgzNDVDNTguMjE0NSAzMy4yNzUgNTguMDY2IDMyLjg0NDUgNTcuNzY5IDMyLjU0M0M1Ny40NzE5IDMyLjI0MTUgNTcuMTA4MiAzMi4wOTE1IDU2LjY3OTMgMzIuMDkxNUM1Ni4yNTA0IDMyLjA5MTUgNTUuODg5NyAzMi4yNDE1IDU1LjYwMDIgMzIuNTQzQzU1LjMxMDggMzIuODQ0NSA1NS4xNjUzIDMzLjI3NSA1NS4xNjUzIDMzLjgzNDVDNTUuMTY1MyAzNC4zOTQgNTUuMzA2MiAzNC44MjQ1IDU1LjU4OTYgMzUuMTI2MUM1NS44NzMgMzUuNDI3NiA1Ni4yMjkyIDM1LjU3NzYgNTYuNjU4MSAzNS41Nzc2QzU2LjkyOTQgMzUuNTc3NiA1Ny4xODU1IDM1LjUxMTYgNTcuNDI2NCAzNS4zODExSDU3LjQyNDlaIiBmaWxsPSJibGFjayI+PC9wYXRoPjxwYXRoIGQ9Ik02MC44MzkyIDMyLjIyOTVDNjEuMDc4NiAzMS43NjkgNjEuNDA0NCAzMS40MTUgNjEuODE2NyAzMS4xNjZDNjIuMjI4OSAzMC45MTg1IDYyLjY4ODEgMzAuNzkzOSA2My4xOTczIDMwLjc5MzlDNjMuNjQxNCAzMC43OTM5IDY0LjAyOTMgMzAuODgyNCA2NC4zNjI3IDMxLjA1OTVDNjQuNjk2MiAzMS4yMzY1IDY0Ljk2MjkgMzEuNDYgNjUuMTYyOSAzMS43M1YzMC44ODk5SDY2LjY3NjlWMzYuNzc5MUg2NS4xNjI5VjM1LjkxODFDNjQuOTcwNSAzNi4xOTQxIDY0LjcwMjIgMzYuNDIzNiA2NC4zNjI3IDM2LjYwMzZDNjQuMDIzMyAzNi43ODUxIDYzLjYzMDcgMzYuODc1MSA2My4xODY3IDM2Ljg3NTFDNjIuNjg1MSAzNi44NzUxIDYyLjIyODkgMzYuNzQ3NiA2MS44MTY3IDM2LjQ5MjZDNjEuNDA0NCAzNi4yMzc2IDYxLjA3ODYgMzUuODc3NiA2MC44MzkyIDM1LjQxNDFDNjAuNTk5NyAzNC45NTA1IDYwLjQ4IDM0LjQxNjUgNjAuNDggMzMuODEzNUM2MC40OCAzMy4yMTA1IDYwLjU5OTcgMzIuNjkgNjAuODM5MiAzMi4yMjk1Wk02NC45NDc3IDMyLjkwNDVDNjQuODAzOCAzMi42NDY1IDY0LjYxMTMgMzIuNDQ3IDY0LjM2NzMgMzIuMzA5QzY0LjEyMzMgMzIuMTcxIDYzLjg2MjYgMzIuMTAyIDYzLjU4MzggMzIuMTAyQzYzLjMwNDkgMzIuMTAyIDYzLjA0NzMgMzIuMTY5NSA2Mi44MTA5IDMyLjMwNDVDNjIuNTc0NCAzMi40Mzk1IDYyLjM4MzUgMzIuNjM2IDYyLjIzNjUgMzIuODk0QzYyLjA4OTUgMzMuMTUzNSA2Mi4wMTY3IDMzLjQ1OTUgNjIuMDE2NyAzMy44MTM1QzYyLjAxNjcgMzQuMTY3NSA2Mi4wODk1IDM0LjQ3OCA2Mi4yMzY1IDM0Ljc0MzVDNjIuMzgzNSAzNS4wMDkxIDYyLjU3NTkgMzUuMjEzMSA2Mi44MTY5IDM1LjM1NDFDNjMuMDU2NCAzNS40OTY2IDYzLjMxMjUgMzUuNTY3MSA2My41ODUzIDM1LjU2NzFDNjMuODU4MSAzNS41NjcxIDY0LjEyNjMgMzUuNDk4MSA2NC4zNjg4IDM1LjM2MDFDNjQuNjEyOCAzNS4yMjIxIDY0LjgwNTMgMzUuMDI0MSA2NC45NDkyIDM0Ljc2NDVDNjUuMDkxNyAzNC41MDY1IDY1LjE2NDUgMzQuMTk2IDY1LjE2NDUgMzMuODM0NUM2NS4xNjQ1IDMzLjQ3MyA2NS4wOTMyIDMzLjE2MjUgNjQuOTQ5MiAzMi45MDQ1SDY0Ljk0NzdaIiBmaWxsPSJibGFjayI+PC9wYXRoPjxwYXRoIGQ9Ik03Ny4zMDQ2IDMxLjQ3MjJDNzcuNzUxNyAzMS45MTQ3IDc3Ljk3NiAzMi41MzQyIDc3Ljk3NiAzMy4zMjc3VjM2Ljc4MjNINzYuNDcyNlYzMy41Mjg3Qzc2LjQ3MjYgMzMuMDY4MiA3Ni4zNTQ0IDMyLjcxNTcgNzYuMTE4IDMyLjQ3MTJDNzUuODgxNiAzMi4yMjY3IDc1LjU1ODcgMzIuMTA1MiA3NS4xNTExIDMyLjEwNTJDNzQuNzQzNCAzMi4xMDUyIDc0LjQxOTEgMzIuMjI2NyA3NC4xNzk2IDMyLjQ3MTJDNzMuOTQwMiAzMi43MTU3IDczLjgyMDQgMzMuMDY4MiA3My44MjA0IDMzLjUyODdWMzYuNzgyM0g3Mi4zMTdWMzMuNTI4N0M3Mi4zMTcgMzMuMDY4MiA3Mi4xOTg4IDMyLjcxNTcgNzEuOTYyNCAzMi40NzEyQzcxLjcyNiAzMi4yMjY3IDcxLjQwMzIgMzIuMTA1MiA3MC45OTU1IDMyLjEwNTJDNzAuNTg3OCAzMi4xMDUyIDcwLjI1MjkgMzIuMjI2NyA3MC4wMTM1IDMyLjQ3MTJDNjkuNzc0IDMyLjcxNTcgNjkuNjU0MyAzMy4wNjgyIDY5LjY1NDMgMzMuNTI4N1YzNi43ODIzSDY4LjE1MDlWMzAuODkzMkg2OS42NTQzVjMxLjYwNTdDNjkuODQ4MyAzMS4zNTgyIDcwLjA5NjggMzEuMTYzMiA3MC40MDE0IDMxLjAyMDdDNzAuNzA2IDMwLjg3OTcgNzEuMDQxIDMwLjgwNzcgNzEuNDA2MiAzMC44MDc3QzcxLjg3MTUgMzAuODA3NyA3Mi4yODY3IDMwLjkwNTIgNzIuNjUyIDMxLjEwMDJDNzMuMDE3MiAzMS4yOTUyIDczLjMwMDYgMzEuNTcyNyA3My41MDA3IDMxLjkzNDJDNzMuNjk0NyAzMS41OTM3IDczLjk3NSAzMS4zMjA3IDc0LjM0MzMgMzEuMTE1MkM3NC43MTE2IDMwLjkwOTcgNzUuMTExNyAzMC44MDYyIDc1LjU0MDYgMzAuODA2MkM3Ni4yNzEgMzAuODA2MiA3Ni44NTkxIDMxLjAyODIgNzcuMzA3NyAzMS40NzA3TDc3LjMwNDYgMzEuNDcyMloiIGZpbGw9ImJsYWNrIj48L3BhdGg+PHBhdGggZD0iTTg0LjY4NzEgMzIuMTEyNUg4My42NDU5VjM2Ljc3OTFIODIuMTIxM1YzMi4xMTI1SDgxLjQ0MzhWMzAuODlIODIuMTIxM1YzMC41OTNDODIuMTIxMyAyOS44Njk5IDgyLjMyODkgMjkuMzM4OSA4Mi43NDQyIDI4Ljk5ODRDODMuMTU5NCAyOC42NTc5IDgzLjc4NTMgMjguNDk4OSA4NC42MjM0IDI4LjUxOTlWMjkuNzczOUM4NC4yNTgyIDI5Ljc2NjQgODQuMDAzNiAyOS44MjY0IDgzLjg2MTEgMjkuOTU1NEM4My43MTcxIDMwLjA4MjkgODMuNjQ1OSAzMC4zMTM5IDgzLjY0NTkgMzAuNjQ3VjMwLjg5MTVIODQuNjg3MVYzMi4xMTRWMzIuMTEyNVoiIGZpbGw9ImJsYWNrIj48L3BhdGg+PHBhdGggZD0iTTg3LjkyODEgMzEuMDcxN0M4OC4yNDAzIDMwLjg5NDcgODguNTk0OSAzMC44MDYyIDg4Ljk5NjUgMzAuODA2MlYzMi4zNjkySDg4LjU5OTVDODguMTI2NiAzMi4zNjkyIDg3Ljc3MDUgMzIuNDc4NyA4Ny41MzEgMzIuNjk5MkM4Ny4yOTE2IDMyLjkxOTcgODcuMTcxOSAzMy4zMDIyIDg3LjE3MTkgMzMuODQ2N1YzNi43ODA4SDg1LjY2ODVWMzAuODkxN0g4Ny4xNzE5VjMxLjgwNjdDODcuMzY1OCAzMS40OTQ3IDg3LjYxNzQgMzEuMjUwMiA4Ny45Mjk2IDMxLjA3MzJMODcuOTI4MSAzMS4wNzE3WiIgZmlsbD0iYmxhY2siPjwvcGF0aD48cGF0aCBkPSJNOTUuNDk0MyAzNC4yODE1SDkxLjE0NDhDOTEuMTgxMiAzNC43MDc1IDkxLjMzMTIgMzUuMDQwNiA5MS41OTY0IDM1LjI4MDZDOTEuODYxNiAzNS41MjIxIDkyLjE4NzUgMzUuNjQyMSA5Mi41NzM5IDM1LjY0MjFDOTMuMTMzMSAzNS42NDIxIDkzLjUzMDIgMzUuNDA1MSA5My43NjY2IDM0LjkyOTVIOTUuMzg4MkM5NS4yMTcgMzUuNDk2NiA5NC44ODY2IDM1Ljk2MzEgOTQuNDAwMSAzNi4zMjc2QzkzLjkxMzYgMzYuNjkyMSA5My4zMTUgMzYuODc1MSA5Mi42MDU3IDM2Ljg3NTFDOTIuMDMyOSAzNi44NzUxIDkxLjUxOTEgMzYuNzQ5MSA5MS4wNjQ1IDM2LjQ5NzFDOTAuNjA5OCAzNi4yNDUxIDkwLjI1NTIgMzUuODg5NiA5MC4wMDA2IDM1LjQyOTFDODkuNzQ1OSAzNC45Njg1IDg5LjYxODcgMzQuNDM3NSA4OS42MTg3IDMzLjgzNDVDODkuNjE4NyAzMy4yMzE1IDg5Ljc0NDQgMzIuNjkgODkuOTk0NSAzMi4yMjk1QzkwLjI0NDYgMzEuNzY5IDkwLjU5NjIgMzEuNDE1IDkxLjA0NzggMzEuMTY2QzkxLjQ5OTQgMzAuOTE4NCA5Mi4wMTc3IDMwLjc5MzkgOTIuNjA1NyAzMC43OTM5QzkzLjE5MzggMzAuNzkzOSA5My42Nzg3IDMwLjkxMzkgOTQuMTI1OCAzMS4xNTU1Qzk0LjU3MjkgMzEuMzk3IDk0LjkyMTUgMzEuNzM5IDk1LjE2NyAzMi4xODE1Qzk1LjQxNCAzMi42MjQgOTUuNTM4MyAzMy4xMzI1IDk1LjUzODMgMzMuNzA3Qzk1LjUzODMgMzMuOTIgOTUuNTIzMSAzNC4xMTA1IDk1LjQ5NTggMzQuMjgxNUg5NS40OTQzWk05My45ODAzIDMzLjI4MjVDOTMuOTcyNyAzMi45IDkzLjgzMzMgMzIuNTk0IDkzLjU2MiAzMi4zNjNDOTMuMjkwOCAzMi4xMzIgOTIuOTU3MyAzMi4wMTggOTIuNTYzMyAzMi4wMThDOTIuMTkwNSAzMi4wMTggOTEuODc4MyAzMi4xMjkgOTEuNjIzNyAzMi4zNTI1QzkxLjM2OTEgMzIuNTc2IDkxLjIxMyAzMi44ODY1IDkxLjE1NjkgMzMuMjgyNUg5My45ODE4SDkzLjk4MDNaIiBmaWxsPSJibGFjayI+PC9wYXRoPjxwYXRoIGQ9Ik0xMDIuMTIxIDM0LjI4MTVIOTcuNzcxMkM5Ny44MDc2IDM0LjcwNzUgOTcuOTU3NyAzNS4wNDA2IDk4LjIyMjkgMzUuMjgwNkM5OC40ODgxIDM1LjUyMjEgOTguODEzOSAzNS42NDIxIDk5LjIwMDQgMzUuNjQyMUM5OS43NTk2IDM1LjY0MjEgMTAwLjE1NyAzNS40MDUxIDEwMC4zOTMgMzQuOTI5NUgxMDIuMDE1QzEwMS44NDMgMzUuNDk2NiAxMDEuNTEzIDM1Ljk2MzEgMTAxLjAyNyAzNi4zMjc2QzEwMC41NCAzNi42OTIxIDk5Ljk0MTUgMzYuODc1MSA5OS4yMzIyIDM2Ljg3NTFDOTguNjU5MyAzNi44NzUxIDk4LjE0NTYgMzYuNzQ5MSA5Ny42OTA5IDM2LjQ5NzFDOTcuMjM2MyAzNi4yNDUxIDk2Ljg4MTYgMzUuODg5NiA5Ni42MjcgMzUuNDI5MUM5Ni4zNzI0IDM0Ljk2ODUgOTYuMjQ1MSAzNC40Mzc1IDk2LjI0NTEgMzMuODM0NUM5Ni4yNDUxIDMzLjIzMTUgOTYuMzcwOSAzMi42OSA5Ni42MjEgMzIuMjI5NUM5Ni44NzEgMzEuNzY5IDk3LjIyMjYgMzEuNDE1IDk3LjY3NDMgMzEuMTY2Qzk4LjEyNTkgMzAuOTE4NCA5OC42NDQyIDMwLjc5MzkgOTkuMjMyMiAzMC43OTM5Qzk5LjgyMDIgMzAuNzkzOSAxMDAuMzA1IDMwLjkxMzkgMTAwLjc1MiAzMS4xNTU1QzEwMS4xOTkgMzEuMzk3IDEwMS41NDggMzEuNzM5IDEwMS43OTMgMzIuMTgxNUMxMDIuMDQgMzIuNjI0IDEwMi4xNjUgMzMuMTMyNSAxMDIuMTY1IDMzLjcwN0MxMDIuMTY1IDMzLjkyIDEwMi4xNSAzNC4xMTA1IDEwMi4xMjIgMzQuMjgxNUgxMDIuMTIxWk0xMDAuNjA3IDMzLjI4MjVDMTAwLjU5OSAzMi45IDEwMC40NiAzMi41OTQgMTAwLjE4OSAzMi4zNjNDOTkuOTE1NyAzMi4xMzIgOTkuNTgzOCAzMi4wMTggOTkuMTg5OCAzMi4wMThDOTguODE3IDMyLjAxOCA5OC41MDQ4IDMyLjEyOSA5OC4yNTAyIDMyLjM1MjVDOTcuOTk1NSAzMi41NzYgOTcuODM5NCAzMi44ODY1IDk3Ljc4MzQgMzMuMjgyNUgxMDAuNjA4SDEwMC42MDdaIiBmaWxsPSJibGFjayI+PC9wYXRoPjxwYXRoIGQ9Ik0xMDQuNzYyIDI4LjkxMjFWMzYuNzc4M0gxMDMuMjU4VjI4LjkxMjFIMTA0Ljc2MloiIGZpbGw9ImJsYWNrIj48L3BhdGg+PHBhdGggZD0iTTExMS45MzUgMzAuODg5NkwxMDguMjUxIDM5LjU2NDRIMTA2LjY1TDEwNy45MzkgMzYuNjMwM0wxMDUuNTU1IDMwLjg4OTZIMTA3LjI0MUwxMDguNzc3IDM1LjAwNDNMMTEwLjMzNSAzMC44ODk2SDExMS45MzVaIiBmaWxsPSJibGFjayI+PC9wYXRoPjwvZz48ZGVmcz48Y2xpcFBhdGggaWQ9ImNsaXAwXzMwMTZfNDU5OSI+PHJlY3Qgd2lkdGg9IjExMiIgaGVpZ2h0PSI0MCIgZmlsbD0id2hpdGUiPjwvcmVjdD48L2NsaXBQYXRoPjwvZGVmcz48L3N2Zz4gCiAgICAKICAKICAgICAgICA8L2Rpdj4KICAgICAgCiAgICAgICAgICAgICAgPGRpdiBjbGFzcz0iYWxvLWJsb2ctYmFubmVyX190aXRsZSI+PHAgY2xhc3M9InNrLXRleHQtLXgtbGFyZ2UiPjxzdHJvbmc+PHNwYW4gY2xhc3M9InNrLWNvbG9yLWJsYWNrIj5WYWNhdGlvbiBkYXRhIHN0YXJ0aW5nPGJyIC8+CmF0PC9zcGFuPiA8c3BhbiBjbGFzcz0ic2stY29sb3ItYmx1ZSI+JDMuNTAvd2Vlazwvc3Bhbj48L3N0cm9uZz48L3A+CjwvZGl2PgogICAgICAKICAgICAgICAgICAgICA8ZGl2IGNsYXNzPSJhbG8tYmxvZy1iYW5uZXJfX2J1dHRvbnMiPgogICAgICAgICAgICAgICAgICA8YSBocmVmPSJodHRwczovL2Fsb3NpbS5jb20vZGVzdGluYXRpb25zLyIgY2xhc3M9InNrLWJ0biBzay1idG4tLWJsdWUgc2stYnRuLS12MiIgdGFyZ2V0PSJfc2VsZiIKICAgICB0aXRsZT0iU2hvcCBPbmxpbmUiPgogICAgPHNwYW4gY2xhc3M9InNrLWJ0bi1pbm5lciI+CiAgICAgICAgICBTaG9wIE9ubGluZQogICAgICAgIDwvc3Bhbj4KICA8L2E+CgogICAgICAgIDwvZGl2PgogICAgICAgICAgPC9kaXY+CgogICAgICAgICAgPGRpdiBjbGFzcz0iYWxvLWJsb2ctYmFubmVyX19iZyI+CiAgICAgICAgCgoKCgoKICAgICAgICAgICAgICAgICAgICAgICAgICAgICAgICAgICAgICAgICAgICAgICAgICAgICAgICAgICAgICAgICAgICAgICAgICAgICAgICAgIAogIAogICAgICAgICAgICAgICAgICAgICAgICAgICAgICAgIAoKICAKICAgIDxwaWN0dXJlPgogICAgICAgICAgICAgICAgICAgICAgICAgICAgICAgICAgICAgICAgCiAgICAgICAgPHNvdXJjZSB0eXBlPSJpbWFnZS93ZWJwIgogICAgICAgICAgICAgICAgc2l6ZXM9IihtYXgtd2lkdGg6IDUxMnB4KSA2MDBweCwgMTAwMHB4IgogICAgICAgICAgICAgICAgc3Jjc2V0PSJodHRwczovL2Fsb3NpbS5jb20vd3AtY29udGVudC91cGxvYWRzLzIwMjYvMDcvNmE0ZDFjMDFjZDgyMC1iY2szLTEwMHgwLWMtZGVmYXVsdC53ZWJwIDEwMHcsIGh0dHBzOi8vYWxvc2ltLmNvbS93cC1jb250ZW50L3VwbG9hZHMvMjAyNi8wNy82YTRkMWMwMWNkODIwLWJjazMtMjAweDAtYy1kZWZhdWx0LndlYnAgMjAwdywgaHR0cHM6Ly9hbG9zaW0uY29tL3dwLWNvbnRlbnQvdXBsb2Fkcy8yMDI2LzA3LzZhNGQxYzAxY2Q4MjAtYmNrMy00MDB4MC1jLWRlZmF1bHQud2VicCA0MDB3LCBodHRwczovL2Fsb3NpbS5jb20vd3AtY29udGVudC91cGxvYWRzLzIwMjYvMDcvNmE0ZDFjMDFjZDgyMC1iY2szLTYwMHgwLWMtZGVmYXVsdC53ZWJwIDYwMHcsIGh0dHBzOi8vYWxvc2ltLmNvbS93cC1jb250ZW50L3VwbG9hZHMvMjAyNi8wNy82YTRkMWMwMWNkODIwLWJjazMtODAweDAtYy1kZWZhdWx0LndlYnAgODAwdywgaHR0cHM6Ly9hbG9zaW0uY29tL3dwLWNvbnRlbnQvdXBsb2Fkcy8yMDI2LzA3LzZhNGQxYzAxY2Q4MjAtYmNrMy0xMjAweDAtYy1kZWZhdWx0LndlYnAgMTIwMHcsIGh0dHBzOi8vYWxvc2ltLmNvbS93cC1jb250ZW50L3VwbG9hZHMvMjAyNi8wNy82YTRkMWMwMWNkODIwLWJjazMtMjQwMHgwLWMtZGVmYXVsdC53ZWJwIDI0MDB3LCBodHRwczovL2Fsb3NpbS5jb20vd3AtY29udGVudC91cGxvYWRzLzIwMjYvMDcvNmE0ZDFjMDFjZDgyMC1iY2szLndlYnAgMzI2NnciCiAgICAgICAgICBtZWRpYT0iKG1pbi13aWR0aDogNjUwcHgpIgogICAgICAgID4KICAgICAgCiAgICAgIAogICAgICAgICAgICAgIDxzb3VyY2UgdHlwZT0iaW1hZ2Uvd2VicCIKICAgICAgICAgICAgICAgIHNpemVzPSIiCiAgICAgICAgICAgICAgICBzcmNzZXQ9Imh0dHBzOi8vYWxvc2ltLmNvbS93cC1jb250ZW50L3VwbG9hZHMvMjAyNi8wNy82YTRkMTE0ZTAyMTMxLTZhNDdiYmU1NWE1MGYtYmNrMi1lMTc4MzA4NjA3ODg0Ny00MDB4MC1jLWRlZmF1bHQud2VicCA0MDB3LCBodHRwczovL2Fsb3NpbS5jb20vd3AtY29udGVudC91cGxvYWRzLzIwMjYvMDcvNmE0ZDExNGUwMjEzMS02YTQ3YmJlNTVhNTBmLWJjazItZTE3ODMwODYwNzg4NDctNjAweDAtYy1kZWZhdWx0LndlYnAgNjAwdywgaHR0cHM6Ly9hbG9zaW0uY29tL3dwLWNvbnRlbnQvdXBsb2Fkcy8yMDI2LzA3LzZhNGQxMTRlMDIxMzEtNmE0N2JiZTU1YTUwZi1iY2syLWUxNzgzMDg2MDc4ODQ3LndlYnAgNjQwdyIKICAgICAgICA+CiAgICAgIAogICAgICAKICAgICAgPGltZyBjbGFzcz0iIgogICAgICAgICAgIHdpZHRoPSIzMjY2IgogICAgICAgICAgIGhlaWdodD0iMTI4MCIKICAgICAgICAgICBhbHQ9IjZhNGQxYzAxY2Q4MjAtYmNrKDMpIgogICAgICAgICAgIHNyYz0iaHR0cHM6Ly9hbG9zaW0uY29tL3dwLWNvbnRlbnQvdXBsb2Fkcy8yMDI2LzA3LzZhNGQxYzAxY2Q4MjAtYmNrMy5wbmciCiAgICAgICAgbG9hZGluZz0ibGF6eSIKICAgICAgPgogICAgPC9waWN0dXJlPgogIAogICAgICA8L2Rpdj4KICAgICAgPC9kaXY+CjwvZGl2Pgo="]
Now all you need to do is activate your data package when you're ready to start using your data.
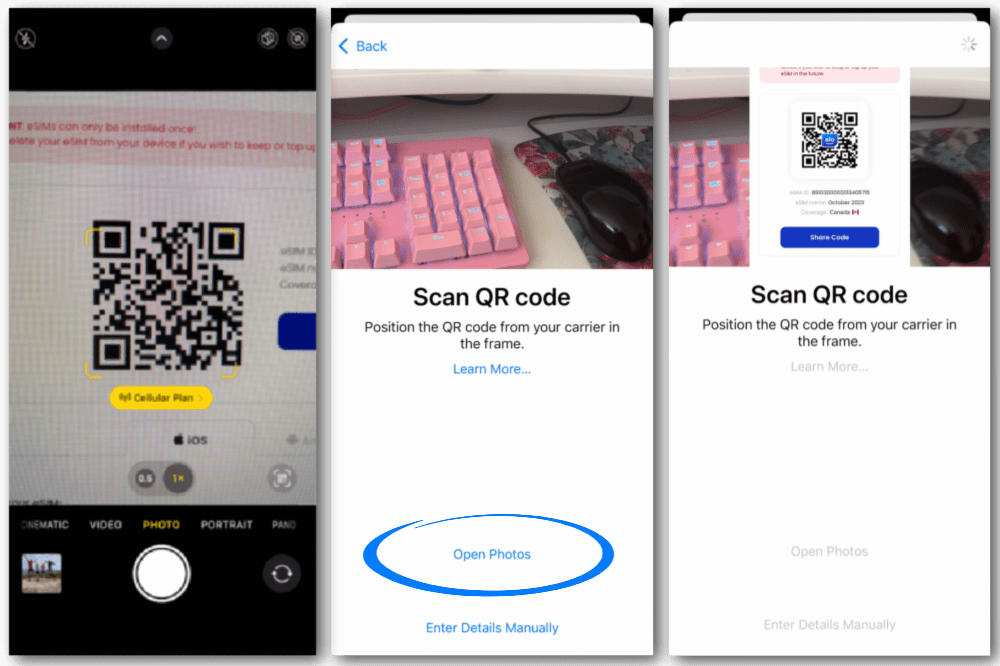
OPTION 2: Install eSIM on iPhone (QR code method)
Start by logging into your account within the aloSIM app or on alosim.com. Go to to "My eSIMs," select the eSIM you just purchased, choose "Install Your eSIM," and select the "QR code" tab.
1. Share your QR code to another device (or open your account on another device) so you can scan it
(If you're running iOS 17 or newer, you can take a screenshot of your QR code instead. Go to Settings > Cellular > Tap 'Add eSIM' > Tap 'Use QR Code' > Tap 'Open Photos' to select your screenshot.)
2. Tap "Continue" to let it work its magic
(This usually takes about two minutes, as the eSIM is installed on your device.)
3. Follow the on-screen prompts
If you're asked to choose a Default Line: Always pick your Primary SIM, since your eSIM doesn't come with a phone number.
If you're asked to choose a plan for iMessage and FaceTime: Pick your Primary SIM (and later, you can make sure iMessage is using your Apple ID email address as well)
If you're asked to choose a Cellular Data Source: Choose your Primary SIM if you're still at home, using your regular data plan. But choose your eSIM if you want to start using your new data (and you're already in the correct country/region for your eSIM to work) and make sure "Allow Cellular Data Switching" is toggled OFF so your phone doesn't try to bounce you between your two SIMs.
Great job! Your eSIM has been installed using the QR code method. If you're running the latest iOS, your APN will be set automatically. (If not, here's how to set it your APN to "alosim." )
Now all you need to do is activate your data package when you're ready to start using your data.
OPTION 3: Install eSIM on iPhone (Manual method)
Start by logging into your account within the aloSIM app or on alosim.com. Go to to "My eSIMs," select the eSIM you just purchased, choose "Install Your eSIM," and select the "Manual" tab.
1. Copy your eSIM's SM-DP address
2. Go into your iPhone's settings, and tap "Cellular" then "Add Cellular Plan" (or "Add eSIM")
3. Instead of scanning a QR code, select "Enter Details Manually."
4. Paste in the SM-DP code you just copied
5. Go back into your aloSIM account and copy the Activation Code
6. Return to the "Enter Activation Code" screen and paste your Activation Code
5. Go back into the aloSIM app and copy the Activation Code
6. Return to the "Enter Activation Code" screen and paste your Activation Code
7. Follow the on-screen prompts
If you're asked to choose a Default Line: Select your Primary SIM, since your eSIM doesn't come with a phone number.
If you're asked to choose a plan for iMessage and FaceTime: Select your Primary SIM (Yes, you'll still be able to use iMessage and FaceTime even if you turn off your regular phone number , because in a minute, you can make sure iMessage is using your Apple ID email address as well)
If you're asked to choose a Cellular Data Source: Choose your Primary SIM if you're still at home, using your regular data plan. But choose your eSIM if you want to start using your new data (and you're already in the correct country/region for your eSIM to work) and make sure "Allow Cellular Data Switching" is toggled OFF so your phone doesn't try to bounce you between your two SIMs.
Great job! Your eSIM has been installed using the Manual eSIM install method. If you're running the latest iOS, your APN will be set automatically. (If not, here's how to set it your APN to "alosim." )
Now all you need to do is activate your data package when you're ready to start using your data.
Let's quickly recap how to install eSIM on a compatible iPhone or iPad ...
Why do I need to install eSIM? To add the digital SIM card to your device.
What happens when I install eSIM? You're able to access new data networks.
When do I install eSIM? Anytime you have a strong connection for a smooth download.
Where do I install eSIM? You'll follow the instructions in your aloSIM app or alosim.com .
How do I install eSIM? Choose from the Automatic , QR code , or Manual eSIM installation options.
Have questions? Need help? Our awesome aloSIM Support team is available 24/7 for friendly assistance.